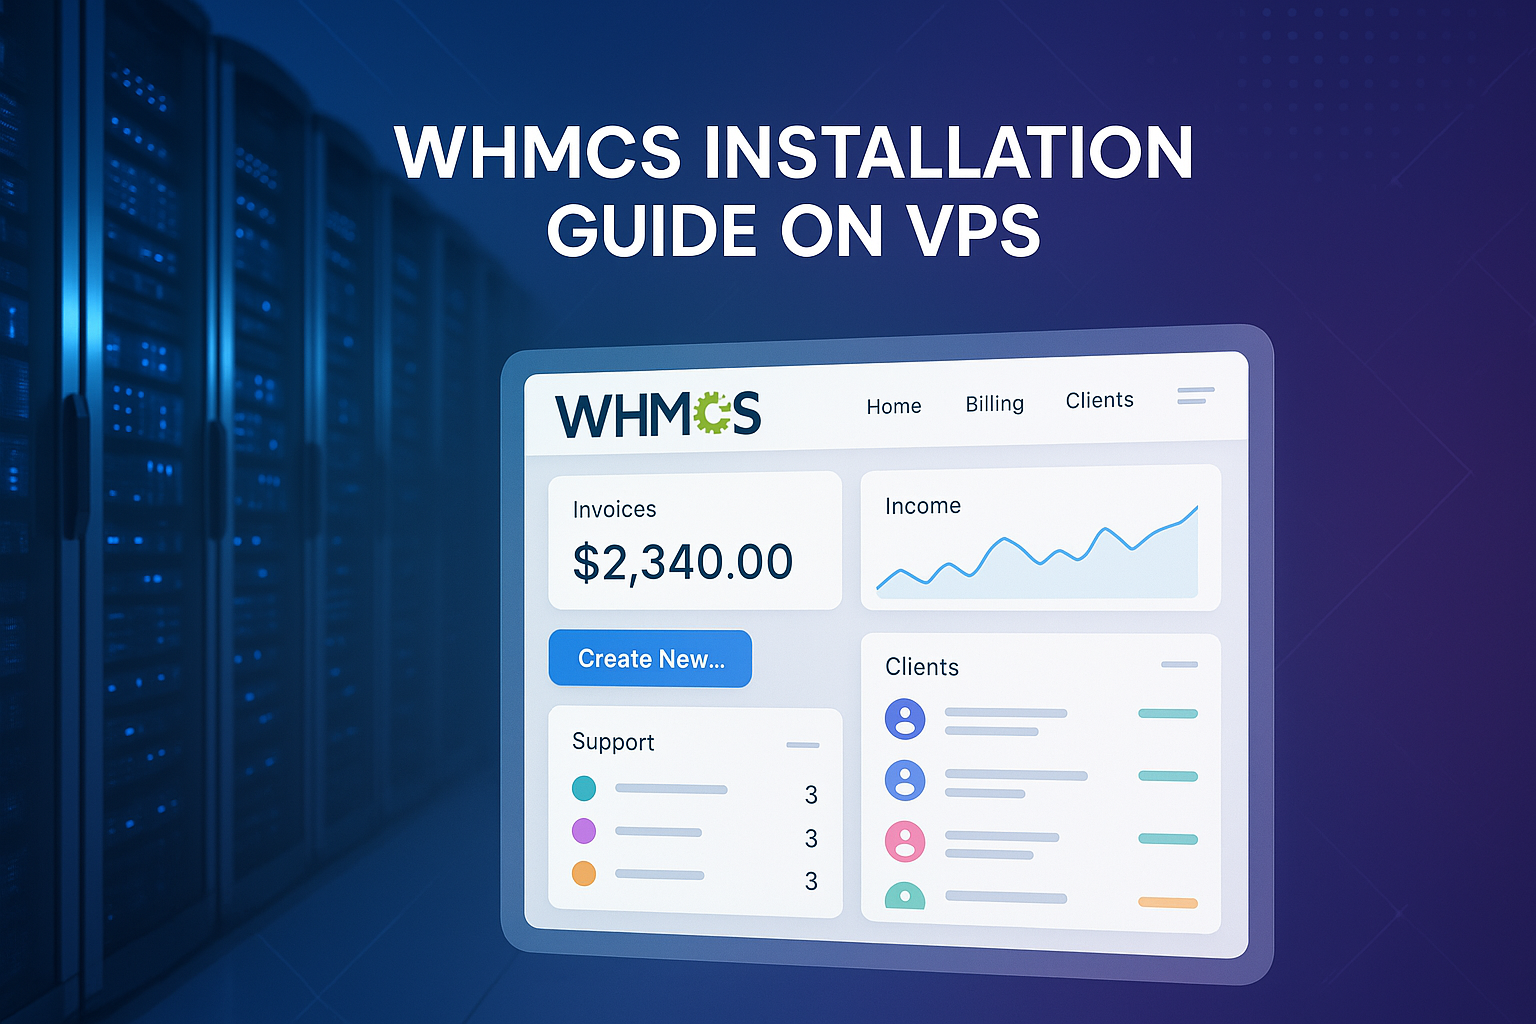
How to Install WHMCS on VPS: Complete Step-by-Step Guide for Beginners
What is WHMCS?
WHMCS (Web Host Manager Complete Solution) is an advanced billing and automation system designed for businesses in web hosting, domain registration, and other related online services. WHMCS specializes in automating business functions such as billing, customer account management, and providing client support through ticketing systems, thereby offering comprehensive support for business processes.
Thousands of hosting businesses around the globe rely on WHMCS as the core of their business operations. It provides features such as invoice automation, domain management, and server provisioning. WHMCS provides an all-in-one solution eliminating multiple system dependencies as WHMCS integrates billing, customer management and support systems.
For hosting providers, WHMCS is more than billing software. It is an all-in-one business management solution which automates payment collections, controls the lifecycle of products and services, and provides in-depth business intelligence with advanced business reports. It is useful with other popular payment systems like PayPal, Stripe, and other credit card processing systems, providing efficient financial operations.
WHMCS automation features are not limited to billing accounts. It can provision hosting accounts, send welcome emails, manage domain registrations, and even suspend accounts for non-payments. This automation will greatly reduce the required labor and the possibility of human error on vital business operations.
WHMCS offers broad options for customization via addon modules and its template system. Through third-party modules or custom development, businesses can modify and enhance brand-specific tailored functions to the client area interface. The template system and addon modules enhance the platform’s customizability. The platform’s language and multiple currency features make it usable for international businesses.
Why Select VPS For Your WHMCS Installation?
When looking at WHMCS installations, a Virtual Private Server (VPS) Hosting serves as the best middle ground between the restrictions that comes with shared hosting and the expensive dedicated server hosting. There is need to understand both the software requirements and the advantages that VPS environments offer to understand why VPS hosting is particularly appropriate for WHMCS.
WHMCS system incorporates modules that deal with sensitive and confidential financial information, critical business processes, and a multitude of sensitive customer data. WHMCS installations need to be shared hosting environments. While dedicated servers dedicated to one client offer the best possible configuration, they do come at a price and resource level that far exceeds the needs and budget of almost all of the small and medium sized hosting companies
Due to the use of Cloud computing, vps hosting is able to bridge the gap as it provides dedicated resources in a virtualized environment. Each VPS is provided with a CPU, RAM and Storage resources along with other users who are housed in the same physical server. This kind of environment provides the WHMCS within every VPS with a dedicated system. Each VPS acts independently. This is important as the speed and responsiveness of the WHMCS installations and access to billing and support systems are critical features for customer satisfaction.
The scalability aspects of VPS hosting are beneficial for a growing hosting business. As a business’s customer base and their transaction volumes grow, VPS resources can be upgraded, which spares businesses the hassle and downtime of server migrations. This scalability makes it easy for companies to begin with modest resource allocations, which optimizes costs while maintaining performance.
The security aspects make VPS hosting more appealing for WHMCS installations. The added isolation of a VPS makes it far less vulnerable to security risks that might compromise other users on shared hosting accounts. VPS users are often granted root access, which lets them implement custom security measures including firewalls and monitoring systems vital for billing data security.
The optimization of performance can be a lot more effortless and hassle-free with the help of VPS hosting. WHMCS administrators are not bound by shared hosting providers, therefore they can adjust server settings, fine-tune databases, and add cache systems freely. Having this control is important for fast page load times and seamless user experiences during busy periods.
Cost effectiveness constitutes an additional significant advantage for selecting VPS hosting in the context of WHMCS. While VPS hosting is more expensive compared to shared hosting, it offers better value for money than dedicated servers for the majority of WHMCS installations. For growing companies, the predictable monthly expenses and the possibility to scale resources make VPS an economically sound option, offering flexibility with a growing WHMCS hosting installation.
System Requirements
Learning the system prerequisites of WHMCS is important for guaranteeing a smooth installation and optimization. The software has to meet certain requisites, which need to be fulfilled before the installation can begin. These prerequisites have changed with more recent versions of WHMCS, especially with regard to PHP compatibility and security policies.
Minimum Hardware Requirements
The WHMCS installation process starts with the appropriate allocation of the required available hardware resources. While WHMCS is capable of operating on limited hardware configurations, it requires higher resources to meet the demands of the users.
CPU Requirements: WHMCS is optimized for modern multi-core processors. For small installations, a dual-core processor is the minimum requirement, while larger installations benefit more from 4 plus cores. The software’s database functions and its ability to manage users scale with CPU resources.
Memory (RAM) Requirements: Allocating memory has a direct impact on WHMCS efficiency, especially during high traffic periods. For basic installations, a minimum of 2GB is suggested, although 4GB is preferable. For installations servicing hundreds of active users, 8GB is recommended to efficiently manage warm cache and active user sessions.
Storage Requirements: WHMCS core installation files require a minimum of 250MB of disk space. However, practical installations require much more space to store system databases, logs, emails, and backups. Atleast 10GB of disk space is recommended, especially on SSDs, which significantly improves database access speeds.
Network Requirements: WHMCS functionalities depend on the integration of several external services, making reliable internet connectivity and WHMCS domain payment gateways crucial. Smooth operations are attainable with a stable connection of at least 100MBps, which is sufficient for most installations.
Software Requirements
WHMCS is typically housed in a LAMP (Linux, Apache, MySQL, PHP) ecosystem, although it can function in other setups of its ecosystem. LAMP systems have newer supplementary restrictions that enhance the system’s safety and efficiency.
Operating System: For WHMCS installations, the most stable and secure options are provided by Linux distributions. Popular choices, CentOS, Ubuntu Server, and Debian, are known for their compatibility and long-term support. Although WHMCS functions on Windows servers, production deployments are best on Linux environments.
Web Server: For WHMCS, Apache HTTP Server version 2.4 and later provide the most reliable and compatible environment. URL Rewrite Module for Apache (mod_rewrite) is required and must be enabled. Nginx’s compatibility with WHMCS is not a cause for concern, but Apache’s extensive testing documentation keep it the preferred choice for WHMCS.
PHP Requirements: Modern WHMCS versions mandate the usage of PHP 8.1 or higher, a significant shift from the previous requirements. This change most certainly optimizes the systems usefulness and reflects the platform’s commitment to modern security standards and performance improvements. PHP 8.2 and 8.3 are also supported and recommended for new installations.
WHMCS core applications also require several extensions to be enabled, including cURL with SSL support especially for PHP. Payment gateway communications, external API work, and a myriad of other functions are impossible without it. In addition, WHMCS’s ability to process image generation and manipulation tasks for invoices and reports relies on the GD2 image library. Lastly, IMAP support is used for email piped functions that enable creating support tickets from emails.
Database Requirements: For WHMCS, MariaDB 10.2 and MySQL 5.7 are acceptable, although MySQL 8.0 is recommended for new installations. WHMCS requires MySQL 8.0 for performance and security, as well as for heightened security measures. Ensure that the database user possesses all relevant privileges, especially having comprehensive access for critical processes such as CREATE, ALTER, DROP, SELECT, INSERT, UPDATE, DELETE and permissions for INDEX.
ionCube Loader: Due to the WHMCS encoding, it is imperative that WHMCS has the ionCube Loader. The WHMCS version and PHP version to be used determine which ionCube version to get. For PHP 8.1, ionCube 12.0.1 is the minimum, and PHP 8.2 needs 13.0.2. For PHP 8.3, 14.4.0 or higher will be required.
Security Requirements
Customer financial information is now a target for hackers, so modern-day WHMCS installations need to comply with the new customer data protection guidelines. Along with software functionality, the WHMCS installations now has to comply with encryption sensors, access codes, and other monitoring capabilities.
SSL/TLS Requirements. The client and the WHMCS server need to use SSL certificates to encrypt the data which is a WHMCS must-have feature. For TLS 1.2 and above, modern-day browsers will accept a secure connection. For WHMCS installations, Let’s Encrypt provides free SSL certificates. Commercial SSL certificates can be used for large businesses.
File Permissions:
File permissions are vital for WHMCS security. The configuration file (configuration.php) must be set to 400 to halt reading for everyone except the owner (read-only for owner) so unauthorized users cannot access the database credentials and other sensitive configuration details. Directories that are supposed to be writable such as attachments, downloads, and templates_c must have permissions set to 755 in order to function properly while maintaining security.
Firewall Configuration:
Firewall rules restricting access to essential ports only are required for VPS installations. If possible, SSH access should be locked to a range of allowed IPs, while database ports must, under all circumstances, remain inaccessible via the public internet. For web traffic, only ports 80 and 443 should be enabled for HTTP and HTTPS traffic, respectively.
Performance Optimization Requirements
WHMCS requires optimal performance, which necessitates a more system-level configuration attention that goes beyond the bare minimum. These optimizations are critical as the customer base expands, and as the transaction volume increases.
PHP Configuration: For larger installations, a WHMCS should at a minimum, have 128MB allocated to the PHP memory limits, while 256MB or more is greatly preferred. The max_execution_time must be set to at least 300 seconds to account for long processes such as database and bulk operations. Reasonable limits should be set for file uploads to allow larger attachment sizes for documentation and support tickets.
Database Optimization: For WHMCS workloads that are characterized by numerous small transactions as opposed to large transactions of data processing, MySQL configuration should be set to such that it is tuned for the workloads. For dedicated database servers, the innodb_buffer_pool_size should be set to roughly 70% of the available ram. Performance for frequently accessed data can be improved via query caching.
Caching Systems: Caching mechanisms described to the WHMCS system them will greatly enhance its overall performance. The caching mechanism can also be described as a session storage and data caching layer that can reduce the load put on the database as well as the time it takes to respond to queries. For PHP, Opcache will enhance performance by caching the compiled scripts. WHMCS performance can greatly benefit from session storage system and data caching from either Redis or Memcached.
Pre-Installation Checklist
Installation of WHMCS will be smooth if the unit is well prepared. In this case, the lessons will be prepared following a checklist that will ensure that prerequisites for WHMCS installations and potential issues are resolved prior to the installations. Additional time taken to follow these WHMCS preparatory installation listed steps will greatly reduce issues and challenges after WHMCS installation completion.
License and Download Preparation
In the installation of WHMCS, the very first step that follows is obtaining a valid license and the software download steps. WHMCS is a system that follows a licensing model. In the installation, WHMCS verifies if the license is well prepared and that is the succause for failing installations.
License Acquisition: WHMCS licenses are obtainable from WHMCS.com or from approved resellers. Each license is tied to a specific domain name and cannot be transferred from one domain to another without following specific procedures. When purchasing a license, ensure that the domain name is as you intend to use it, matching the intended installation domain and any subdomain specifications.
Account Setup: Creating an account in the WHMCS Members Area allows one to access downloads, documentation, and support resources. This account, as has been noted, will be helpful in the future in terms of updates and accessing other pertinent resources. Make sure that the email tied to the account is accessible, as important communications concerning updates and security will be sent to that email.
Download Process: The installation files are included in the WHMCS download package. Except in cases where a specific compatibility needs to be met, it is always best to download the latest stable version available. The download package is given in a zip format which includes the entire WHMCS directory structure and all the files needed.
File Integrity Verification: Verifying the ZIP file to ensure it wasn’t corrupted during transfer is a form of integrity checking which is crucial. WHMCS has checksums which aid file integrity verification and ensures there are no installation issues as a result of corrupted files.
Verification of Server Environment
In order to avoid installation issues and ensure that WHMCS operates to its full potential from the very outset, it is important to verify that your VPS environment meets all the requirements. The process is structured, and all steps should be conducted meticulously in order to detect any underlying issues that could affect the installation process.
PHP Version Verification: Confirm that PHP 8.1 or higher is both installed and active through your system’s command line or a PHP info file. The PHP version must be consistent across both the command line and web server environments. WHMCS installation issues arise when a system is configured to use the wrong version due to the presence of multiple installed PHP versions.
Extension Availability: Compile a comprehensive list of all required PHP extensions and verify whether the list is complete or if some extensions require installation. The php -m command provides a list of installed modules, while phpinfo() provides a veritable treasure trove of of an extension’s details such as its version or configuration settings. Ensure that WHMCS critical extensions such as cURL, GD2, IMAP, and PDO are accounted for.
Installation of ionCube Loader: ionCube has to be installed and compatible with your PHP version in order for you to use it. IonCube’s functionality necessitates that it be preloaded before other PHP extensions; WHMCS critical extensions are necessary for ionCube’s functionality as well. It is best to check both command line and web server PHP configurations to ensure consistency.
Database Connectivity: Inspect database connectivity via the command line tools and through PHP scripts. Check that the database user has the necessary privileges to perform the CREATE, ALTER, and DROP operations. Ensure that connectivity is tested from the web server in order to verify that any firewall rules or network settings do not block access to the database.
Web Server Configuration: Check if Apache is properly installed with mod_rewrite turned on. Check that the rewriting of the URLs is working properly to confirm that the friendly URLs for WHMCS will function. Confirm that the web server can write to the necessary directories and that the file permissions are set properly.
Security Preparation
Working to secure the system before installation will always be preferable to trying to remove WHMCS system later. This ensures that data is always secured from the instant the system is operational.
SSL Certificate Installation: Configuring the SSL certificates before installation ensures the configuration and testing phase use WHMCS are done over secure connections. WHMCS configuration verifying and testing are done over SSL, thus the settings of SSL is tested with verifying tools online.
Firewall Configuration: Create detailed firewall access policies to allow only the required services and ports. If possible, restrict SSH access to specific IP address ranges. There should be no access to database ports from the public internet. Web traffic should be limited to the HTTP and HTTPS ports.
User Account Security: Rather than using root or administrative accounts, create dedicated user accounts for WHMCS tasks with the least required privileges to perform the tasks. Strong password protocols should be implemented alongside SSH key login for administration with strong password protocols.
Backup Strategy Planning: Establish and verify the procedures for file and database backups prior to beginning the installation. Configuration and testing of automated systems for backups should ensure reliable and continuous data protection from the start.
Domain and DNS Configuration
Correct the preceding work to make WHMCS available to users, and ensure the functionality of the integrated services to the users requires proper domain and DNS configuration. This preparation eliminates the risk of connectivity issues that could disrupt customer access and business operations.
Domain Registration Verification: Ensure the domain is registered and verify administrative control over DNS. The domain should be fully propagated and accessible from various locations before installation begins.
DNS Record Configuration: Create DNS records A for the main domain and all subdomains that will be used. It would be useful to add CNAME records for subdomains such as ‘www’ and ‘billing’. MX records also need to be created for domain that hosts emails.
Subdomain Planning: A lot of WHMCS installations utilize the subdomains billing.yourdomain.com or client.yourdomain.com. Prepare and adjust the DNS records for these subdomains. Make sure the SSL certs will cover all planned subdomains.
Email Configuration: Outline the configuration for emails. Create email accounts for WHMCS functions that includes support emails, billing, and admin emails. Set SPF, DKIM, DMARC records to enhance outgoing emails.
Step-by-Step Installation Process

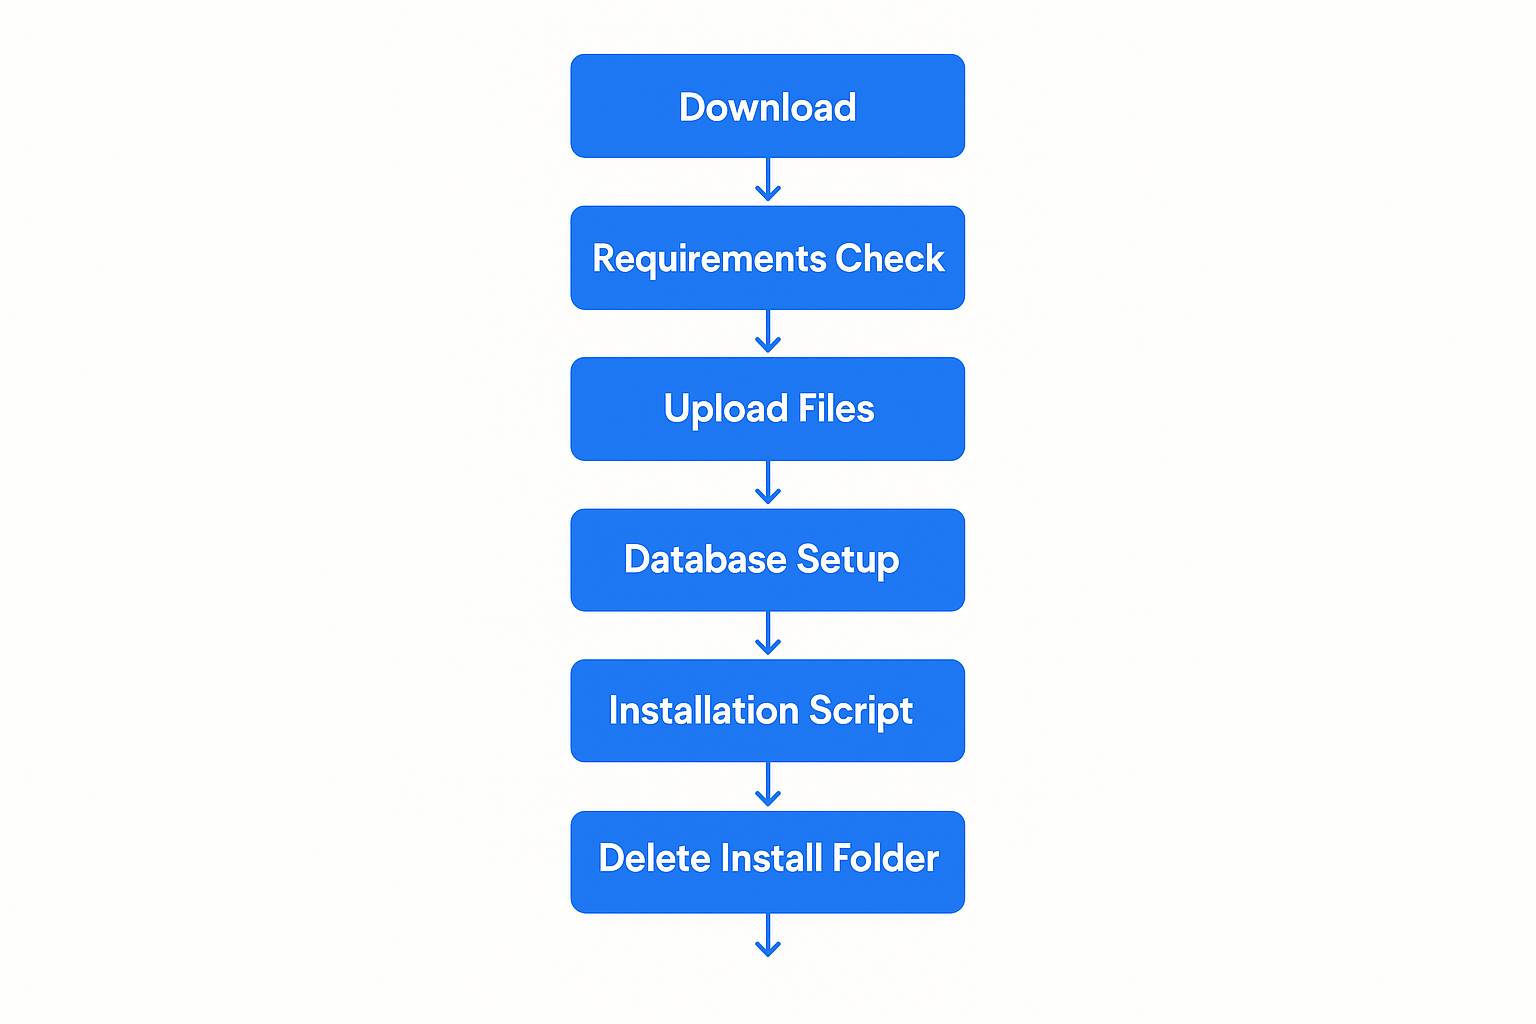
The WHMCS installation process consists of seven main steps that must be completed in sequence. Each step builds upon the previous one, and skipping or incorrectly completing any step can result in installation failure or operational issues. This section provides detailed instructions for each step, including screenshots and troubleshooting guidance.
Step 1: Purchase License and Download WHMCS
The first step in installing WHMCS involves obtaining a valid license and downloading the software package. This process requires careful attention to licensing terms and proper file handling to ensure a successful installation.
Purchasing Your WHMCS License
WHMCS licenses are available through the official WHMCS website or authorized resellers. The licensing model is based on the number of active clients in your system, with pricing tiers that scale with business growth. When purchasing a license, you’ll need to specify the domain name where WHMCS will be installed, as licenses are domain-specific and cannot be easily transferred.
The license purchase process requires providing accurate business information and contact details. This information is used for license verification and important communications regarding updates and security notices. Ensure that the email address provided is actively monitored, as it will be used for license-related communications and account recovery if needed.
After purchase completion, you’ll receive a license key via email. This key is essential for the installation process and should be stored securely. The license key is unique to your installation and should never be shared or used on multiple domains without proper authorization.
Accessing the WHMCS Members Area
Once your license is purchased, you’ll gain access to the WHMCS Members Area, which serves as your central hub for downloads, documentation, and support resources. The Members Area login credentials are typically sent via email after license purchase, though some reseller purchases may require additional steps to gain access.
The Members Area provides access to the latest WHMCS releases, including both stable versions and beta releases for testing purposes. Always download the latest stable version unless specific compatibility requirements dictate otherwise. Beta versions should only be used for testing and development purposes, never for production installations.
Downloading WHMCS Files
Navigate to the Downloads section within the Members Area and locate the “Full Release” download option. This package contains all necessary files for a complete WHMCS installation. The download is provided as a ZIP file that typically ranges from 50-100MB depending on the version.
Download the file to a secure location on your local computer. Avoid downloading directly to the server, as this can expose the installation files to potential security risks during the download process. The local download also allows for file integrity verification before upload.
File Integrity Verification
After downloading, verify the integrity of the ZIP file to ensure it wasn’t corrupted during transfer. WHMCS provides MD5 or SHA checksums for their download packages. Use appropriate tools on your operating system to verify these checksums match the downloaded file.
On Linux systems, use the md5sum or sha256sum commands to generate checksums for comparison. On Windows, PowerShell’s Get-FileHash cmdlet provides similar functionality. Mac users can use the md5 or shasum commands in Terminal.
If checksums don’t match, re-download the file before proceeding. Corrupted installation files can cause various issues during installation and operation, making this verification step crucial for success.
Step 2: Verify System Requirements
Before proceeding with file uploads and installation, thoroughly verify that your VPS environment meets all WHMCS requirements. This verification process prevents installation failures and ensures optimal performance from the start.
PHP Version and Extension Verification
Create a PHP information file to verify your server’s PHP configuration. Create a file named phpinfo.php in your web server’s document root with the following content:
PHP
<?php phpinfo(); ?>
Access this file through your web browser to view comprehensive PHP configuration information. Verify that PHP 8.1 or higher is active and that all required extensions are installed and enabled.
Pay particular attention to the following extensions:
•cURL: Required for payment gateway communications and external API calls
•GD2: Necessary for image generation and manipulation
•IMAP: Required for email piping functionality
•ionCube Loader: Essential for running WHMCS’s encoded files
•JSON: Required for data processing and API communications
•PDO and PDO_MySQL: Necessary for database connectivity
•Reflection: Required for various WHMCS operations
•XML: Necessary for data processing and external integrations
Database Connectivity Testing
Test database connectivity using both command-line tools and PHP scripts. Create a simple PHP script to verify database connectivity:
PHP
<?php $host = ‘localhost’; $username = ‘your_db_user’; $password = ‘your_db_password’; $database = ‘your_db_name’; try { $pdo = new PDO(“mysql:host=$host;dbname=$database”, $username, $password); echo “Database connection successful!”; } catch(PDOException $e) { echo “Connection failed: ” . $e->getMessage(); } ?>
Verify that the database user has all necessary privileges by attempting to create, alter, and drop test tables. The user must have comprehensive permissions including CREATE, ALTER, DROP, SELECT, INSERT, UPDATE, DELETE, and INDEX privileges.
ionCube Loader Verification
Verify ionCube Loader installation and compatibility with your PHP version. The ionCube Loader must be properly installed and loaded before other PHP extensions. Check the PHP information page for ionCube Loader details, including version number and configuration.
If ionCube Loader is not installed or is incompatible with your PHP version, install the appropriate version before proceeding. ionCube provides installation packages for various operating systems and PHP versions through their website.
Web Server Configuration Check
Verify that Apache is properly configured with necessary modules enabled. The mod_rewrite module is essential for WHMCS’s friendly URL functionality. Test mod_rewrite by creating a simple .htaccess file with rewrite rules and verifying that they function correctly.
Check that the web server can write to directories that will require write permissions during installation. These include the attachments, downloads, and templates_c directories within the WHMCS installation.
Step 3: Upload Files to Your Server
Uploading WHMCS files to your server requires careful attention to file integrity and proper directory structure. The upload process can be completed using various methods, with cPanel File Manager and FTP being the most common approaches.
Preparing the Upload Directory
Determine the appropriate directory for your WHMCS installation. Most installations use the public_html directory for main domain installations or a subdirectory for subdomain installations. Ensure that the target directory has appropriate permissions and is accessible through the web server.
Clean the target directory of any existing files that might conflict with the WHMCS installation. While WHMCS can coexist with other applications, it’s best practice to use a clean directory to avoid potential conflicts.
Using cPanel File Manager
cPanel’s File Manager provides a user-friendly interface for uploading and extracting WHMCS files directly on the server. This method is often preferred because it eliminates the need for separate FTP software and handles file extraction automatically.
Access cPanel and navigate to the File Manager interface. Select the appropriate directory for your installation, typically public_html for main domain installations. Use the Upload function to transfer the WHMCS ZIP file to the server.
After upload completion, locate the ZIP file in the File Manager and right-click to access the Extract option. Choose the extraction destination carefully, ensuring that files are extracted to the correct directory. The extraction process creates a ‘whmcs’ folder containing all installation files.
FTP Upload Method
For users preferring FTP clients or those without cPanel access, FTP upload provides an alternative method for transferring WHMCS files. This method requires extracting the ZIP file locally before upload, which allows for file verification before transfer.
Extract the WHMCS ZIP file on your local computer, creating a folder structure with all necessary files. Use an FTP client like FileZilla, WinSCP, or similar software to connect to your server. Configure the FTP client for binary mode transfer to ensure file integrity during upload.
Upload the entire WHMCS directory structure to your server, maintaining the original folder hierarchy. This process may take several minutes depending on connection speed and file sizes. Verify that all files transferred successfully by comparing local and remote file counts.
File Permission Configuration
After uploading, configure appropriate file permissions for WHMCS operation. Most files should have 644 permissions (readable by owner and group, readable by others), while directories should have 755 permissions (readable and executable by all, writable by owner).
Specific directories require write permissions for WHMCS operation:
•attachments: Set to 755 or 777 depending on server configuration
•downloads: Set to 755 or 777 for file storage
•templates_c: Set to 755 or 777 for template compilation
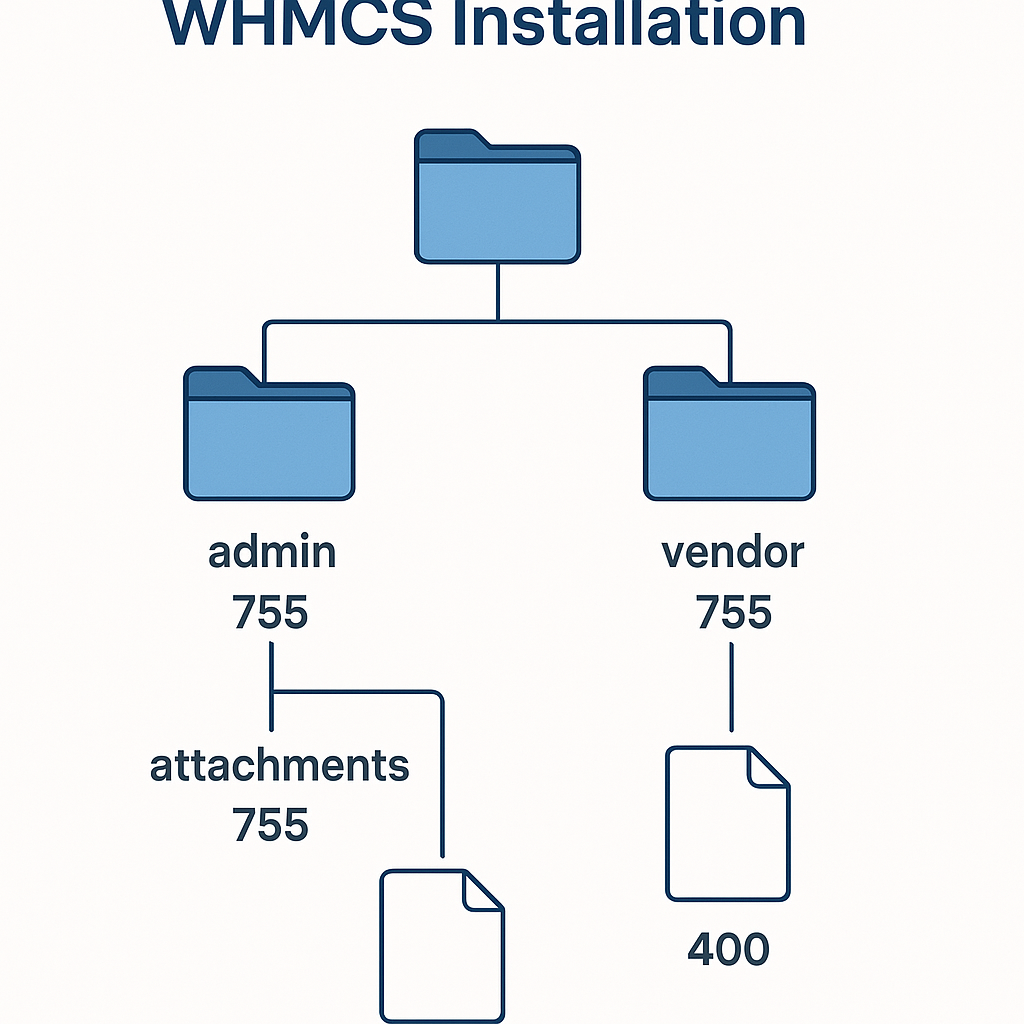
The configuration.php file, which will be created during installation, should be set to 400 permissions (readable by owner only) after installation completion for security purposes.
Directory Structure Verification
Verify that the uploaded WHMCS directory structure is complete and intact. The main WHMCS directory should contain subdirectories including admin, assets, includes, lang, modules, resources, templates, and vendor, among others.
Check that critical files are present, including index.php in the main directory and various PHP files throughout the directory structure. Missing files can cause installation failures or operational issues later.
Step 4: Create WHMCS Database
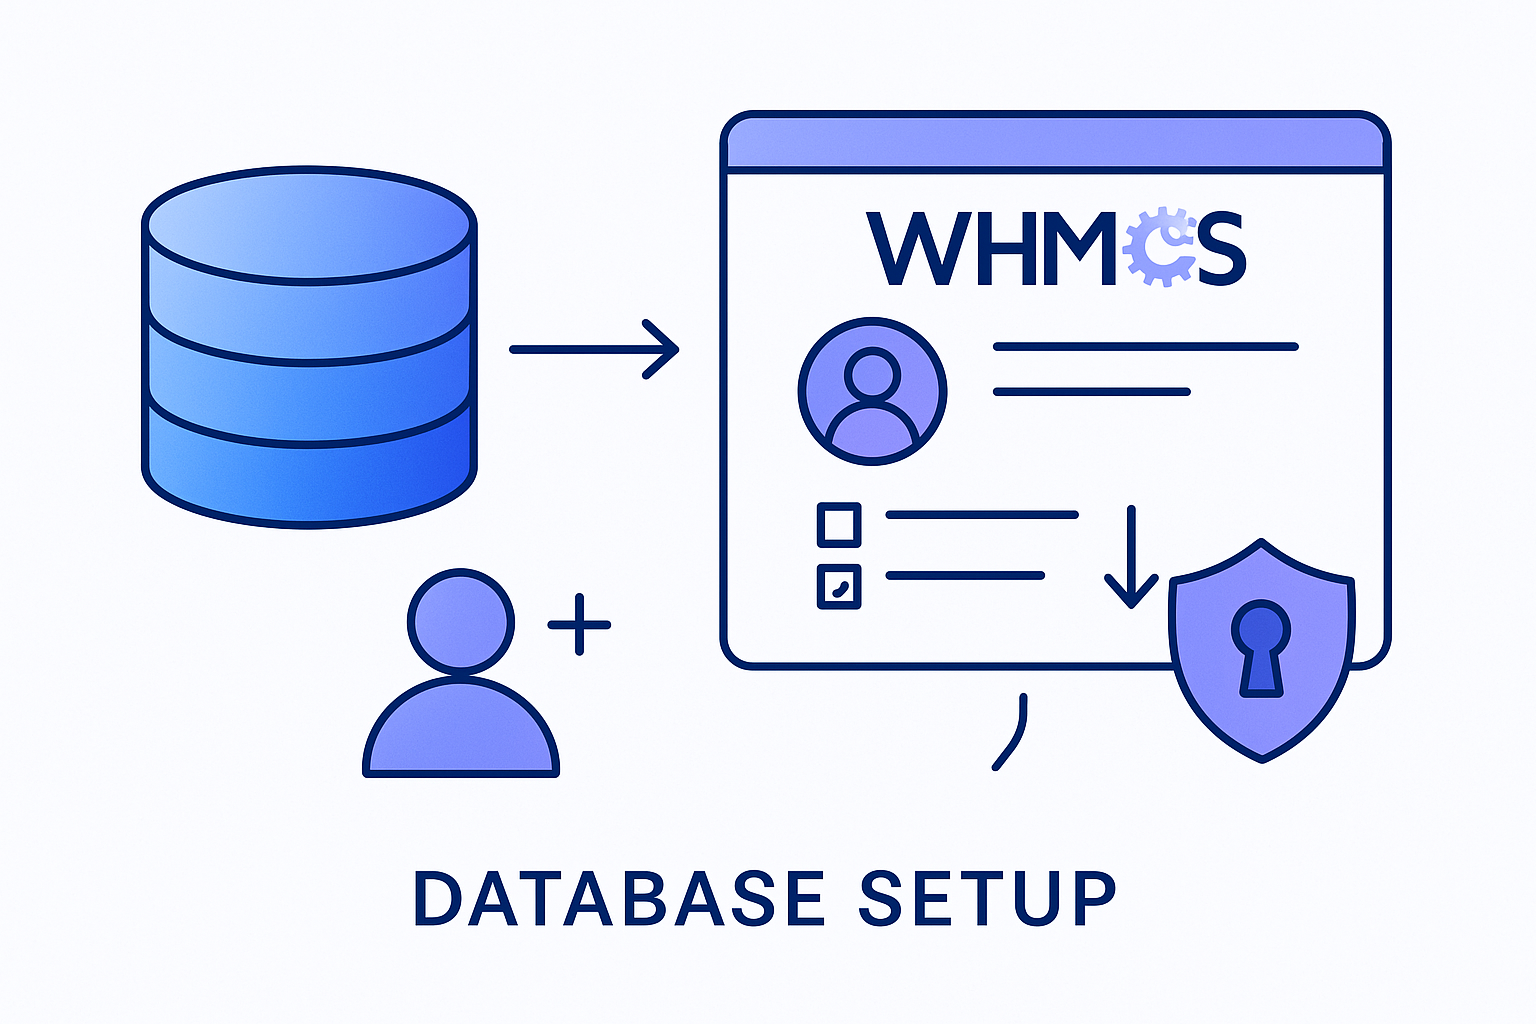
Database creation and configuration is a critical step that requires careful attention to user privileges and security settings. The database will store all WHMCS data, including customer information, billing records, and system configurations.
Database Creation Methods
Most VPS environments provide multiple methods for database creation, including cPanel interfaces, phpMyAdmin, and command-line tools. Choose the method that you’re most comfortable with, ensuring that you have administrative access to create databases and users.
Using cPanel MySQL Databases
cPanel’s MySQL Databases interface provides a straightforward method for creating WHMCS databases. Access cPanel and navigate to the MySQL Databases section under the Databases category.
Create a new database with a descriptive name that clearly identifies it as the WHMCS database. Database names are typically prefixed with your cPanel username, resulting in names like “username_whmcs” or “username_billing”. Record the complete database name as it will be needed during installation.
After database creation, create a dedicated database user for WHMCS operations. Use a strong password that combines uppercase and lowercase letters, numbers, and special characters. The password should be at least 12 characters long and unique to this database user.
Add the newly created user to the WHMCS database with full privileges. WHMCS requires comprehensive database permissions including SELECT, INSERT, UPDATE, DELETE, CREATE, ALTER, DROP, and INDEX privileges. Grant all privileges to ensure proper operation.
Command Line Database Creation
For users comfortable with command-line interfaces, MySQL can be accessed directly through SSH. This method provides more control over database creation and user configuration.
Connect to your server via SSH and access MySQL using the root account or another account with database creation privileges:
Bash
mysql -u root -p
Create the WHMCS database:
SQL
CREATE DATABASE whmcs_database CHARACTER SET utf8mb4 COLLATE utf8mb4_unicode_ci;
Create a dedicated database user:
SQL
CREATE USER ‘whmcs_user’@’localhost’ IDENTIFIED BY ‘strong_password_here’;
Grant necessary privileges:
SQL
GRANT ALL PRIVILEGES ON whmcs_database.* TO ‘whmcs_user’@’localhost’; FLUSH PRIVILEGES;
Database Security Configuration
Configure database security settings to protect sensitive WHMCS data. Ensure that the database server is not accessible from external networks unless specifically required. Database connections should be restricted to localhost or specific IP addresses.
Implement regular database backup procedures before proceeding with installation. Automated backup systems should be configured to create regular snapshots of the database, allowing for recovery in case of data loss or corruption.
Consider implementing database encryption for additional security, particularly if the VPS is hosted in shared environments. MySQL supports various encryption options that can protect data at rest.
Connection Testing
Test database connectivity using the credentials created for WHMCS. Create a simple PHP script to verify that the database connection works correctly:
PHP
<?php $host = ‘localhost’; $username = ‘whmcs_user’; $password = ‘your_password’; $database = ‘whmcs_database’; try { $pdo = new PDO(“mysql:host=$host;dbname=$database;charset=utf8mb4”, $username, $password); $pdo->setAttribute(PDO::ATTR_ERRMODE, PDO::ERRMODE_EXCEPTION); echo “Database connection successful!”; } catch(PDOException $e) { echo “Connection failed: ” . $e->getMessage(); } ?>
Successful connection testing confirms that the database is properly configured and ready for WHMCS installation.
Step 5: Run the WHMCS Installation Script
The WHMCS installation script automates the process of configuring the software and creating necessary database tables. This web-based installer guides you through the configuration process and performs initial system setup.
Accessing the Installation Script
Navigate to the WHMCS installation script using your web browser. The script is located at:
Plain Text
Replace “yourdomain.com” with your actual domain name and adjust the path if you installed WHMCS in a different directory. Ensure that you’re accessing the script over HTTPS to protect sensitive information during the installation process.
License Agreement Acceptance
The installation process begins with the WHMCS End User License Agreement (EULA). Read through the license terms carefully, as they govern your use of the software. The license agreement covers important topics including usage restrictions, support terms, and liability limitations.
Accept the license agreement to proceed with installation. This acceptance is legally binding and indicates your agreement to comply with WHMCS licensing terms.
System Requirements Check
The installer performs an automated check of your server environment to verify that all requirements are met. This check examines PHP version, required extensions, file permissions, and other critical configuration items.
Review the requirements check results carefully. Any items marked as failed or warnings must be addressed before proceeding. Common issues include missing PHP extensions, incorrect file permissions, or insufficient PHP memory limits.
If requirements check failures are identified, exit the installer and address the issues before attempting to continue. Proceeding with failed requirements can result in installation failure or operational problems later.
Database Configuration
Enter the database connection information created in Step 4. This includes:
•Database Host: Typically “localhost” for VPS installations
•Database Name: The complete database name created earlier
•Database Username: The database user created for WHMCS
•Database Password: The password for the database user
Test the database connection using the installer’s built-in testing function. This verification ensures that WHMCS can successfully connect to and interact with the database.
License Key Entry
Enter your WHMCS license key exactly as provided in your purchase confirmation email. License keys are case-sensitive and must be entered precisely. The installer will validate the license key against WHMCS servers, requiring an active internet connection.
License validation confirms that your key is valid and authorized for use on the specified domain. Invalid or expired licenses will prevent installation from proceeding.
Administrator Account Creation
Create the primary administrator account that will be used to manage WHMCS. This account has full administrative privileges and should be secured with a strong password.
Administrator account information includes:
•First Name and Last Name: Your personal information
•Email Address: A valid email address for administrative communications
•Username: A unique username for login purposes
•Password: A strong password meeting security requirements
The administrator email address will receive important system notifications and should be actively monitored. Choose a username that’s not easily guessable and avoid common names like “admin” or “administrator”.
Initial Configuration Settings
Configure basic WHMCS settings during installation:
•Company Name: Your business name as it will appear in WHMCS
•Company Email: Primary business email address
•Currency: Default currency for billing operations
•Country: Your business location
These settings can be modified after installation, but setting them correctly during installation saves configuration time later.
Installation Process Execution
After all information is entered and verified, the installer begins the actual installation process. This involves creating database tables, configuring initial settings, and setting up the WHMCS file structure.
The installation process typically takes several minutes to complete. Do not close the browser window or navigate away during this process, as interruption can result in incomplete installation requiring manual cleanup.
Monitor the installation progress and watch for any error messages. Successful installation will display a completion message with next steps for accessing your WHMCS installation.
Step 6: Delete Installation Directory
After successful installation completion, the installation directory must be removed for security purposes. This directory contains sensitive installation scripts that could be exploited if left accessible.
Security Importance
The installation directory contains scripts and files that provide detailed information about your server configuration and WHMCS setup. Leaving these files accessible creates potential security vulnerabilities that could be exploited by malicious users.
WHMCS will display security warnings and may restrict functionality if the installation directory remains present. Removing this directory is essential for proper system operation and security compliance.
Removal Methods
The installation directory can be removed using various methods depending on your server access level and preferences.
Using cPanel File Manager
Access cPanel File Manager and navigate to your WHMCS installation directory. Locate the “install” folder and select it for deletion. Confirm the deletion when prompted, ensuring that the entire directory and its contents are removed.
Verify that the directory has been completely removed by refreshing the File Manager view and confirming that the “install” folder is no longer present.
Using FTP Client
Connect to your server using an FTP client and navigate to the WHMCS installation directory. Select the “install” folder and delete it along with all its contents. Most FTP clients will prompt for confirmation before deleting directories.
Command Line Removal
For users with SSH access, the installation directory can be removed using command-line tools:
Bash
rm -rf /path/to/whmcs/install/
Replace “/path/to/whmcs/” with the actual path to your WHMCS installation directory.
Verification
After removal, verify that the installation directory is no longer accessible by attempting to access the installation script URL. The page should return a 404 error or similar indication that the directory no longer exists.
Step 7: Configure File Permissions
Proper file permissions are essential for WHMCS security and functionality. Incorrect permissions can create security vulnerabilities or prevent WHMCS from operating correctly.
Understanding File Permissions
Unix-style file permissions control who can read, write, and execute files and directories. WHMCS requires specific permissions for different files and directories to balance functionality with security.
Permission numbers represent different access levels:
•4: Read permission
•2: Write permission
•1: Execute permission
These numbers are combined to create permission values, with separate values for owner, group, and others.
WHMCS-Specific Permission Requirements
Configure the following permissions for WHMCS files and directories:
Configuration File: The configuration.php file contains sensitive database credentials and system settings. Set this file to 400 permissions (readable by owner only) to prevent unauthorized access:
Bash
chmod 400 configuration.php
Writable Directories: Several directories require write permissions for WHMCS operation:
Bash
chmod 755 attachments/ chmod 755 downloads/ chmod 755 templates_c/
Some server configurations may require 777 permissions for these directories, though 755 is preferred for security reasons.
General File Permissions: Most WHMCS files should have 644 permissions:
Bash
find /path/to/whmcs/ -type f -exec chmod 644 {} \;
Directory Permissions: Directories should generally have 755 permissions:
Bash
find /path/to/whmcs/ -type d -exec chmod 755 {} \;
Permission Verification
After setting permissions, verify that WHMCS can access necessary files and directories. Log into the WHMCS admin area and check for any permission-related error messages.
Test file upload functionality in areas like support ticket attachments to ensure that writable directories are properly configured.
Ongoing Permission Management
Implement procedures for maintaining proper permissions during updates and modifications. WHMCS updates may reset some permissions, requiring reconfiguration after each update.
Consider using automated scripts to verify and correct permissions on a regular basis, ensuring that security standards are maintained over time.
Post-Installation Configuration
Successfully installing WHMCS is only the beginning of creating a fully functional billing and automation system. Post-installation configuration involves setting up essential features, configuring integrations, and optimizing the system for your specific business needs. This phase is crucial for ensuring that WHMCS operates efficiently and provides the functionality your business requires.
Initial Admin Area Setup
After installation completion, accessing the WHMCS Admin Area for the first time presents you with the Getting Started Wizard. This wizard streamlines the initial configuration process by guiding you through essential settings that must be configured before WHMCS can be used for production operations.
Accessing the Admin Area
Navigate to your WHMCS admin area using the URL format:
Plain Text
Log in using the administrator credentials created during installation. The first login will automatically launch the Getting Started Wizard, which provides a structured approach to initial configuration.
Company Information Configuration
The first step in the Getting Started Wizard involves configuring your company information. This information appears throughout WHMCS, including invoices, emails, and the client area interface.
Enter comprehensive company details including:
•Company Name: Your official business name as it should appear on invoices
•Company Address: Complete business address including street, city, state, and postal code
•Phone Number: Primary business contact number
•Email Address: Main business email address for customer communications
•Website URL: Your primary business website address
Upload your company logo in appropriate formats (PNG or JPG recommended). The logo should be high-quality and appropriately sized for use in various contexts including invoices, emails, and web interfaces. WHMCS automatically resizes logos, but providing optimally sized images ensures better visual quality.
Currency and Localization Settings
Configure your primary currency and localization settings to match your business location and target market. WHMCS supports multiple currencies, but establishing a primary currency is essential for initial setup.
Select your default currency from the extensive list of supported currencies. This currency will be used for all pricing displays and calculations unless specifically overridden for individual products or clients.
Configure regional settings including:
•Date Format: Choose the date format that matches your regional preferences
•Time Zone: Set the appropriate time zone for your business location
•Language: Select the default language for admin and client interfaces
These settings affect how dates, times, and numbers are displayed throughout WHMCS and should match your business location and customer expectations.
Payment Gateway Configuration
Payment gateway integration is essential for automated billing operations. WHMCS supports numerous payment gateways, allowing businesses to accept various payment methods including credit cards, PayPal, bank transfers, and alternative payment systems.
PayPal Integration
PayPal integration provides a quick and reliable method for accepting online payments. WHMCS supports both PayPal Standard and PayPal Pro integrations, with PayPal Standard being easier to implement for most businesses.
To configure PayPal Standard:
Navigate to Configuration > System Settings > Payment Gateways in the WHMCS admin area. Locate PayPal in the available gateways list and click to configure.
Enter your PayPal business email address in the configuration settings. This email address must match the email associated with your PayPal business account to ensure proper payment processing.
Configure additional PayPal settings including:
•Currency: Ensure this matches your WHMCS primary currency
•Language: Set to match your customer base language preferences
•Return URL: WHMCS automatically configures this for payment confirmations
Test the PayPal integration using WHMCS’s test mode functionality before enabling live payments. This testing ensures that payments process correctly and that customers receive appropriate confirmations.
Credit Card Processing
For businesses requiring direct credit card processing, WHMCS integrates with numerous merchant account providers and payment processors. Popular options include Stripe, Authorize.Net, and Square.
Stripe integration provides comprehensive credit card processing with modern security features and competitive pricing. To configure Stripe:
Create a Stripe account and obtain your API keys from the Stripe dashboard. You’ll need both publishable and secret keys for WHMCS integration.
In WHMCS, navigate to the payment gateways configuration and select Stripe. Enter your API keys and configure additional settings including:
•Webhook URL: Configure Stripe webhooks to ensure payment status updates
•Currency: Verify currency compatibility between Stripe and WHMCS
•3D Secure: Enable for enhanced security on credit card transactions
Bank Transfer Configuration
Bank transfer payments provide an alternative for customers who prefer traditional payment methods. WHMCS includes built-in bank transfer functionality that generates payment instructions for customers.
Configure bank transfer settings including:
•Bank Name: Your business bank name
•Account Name: The name on your business bank account
•Account Number: Your business account number
•Routing Information: Any additional routing or reference information
Customize the bank transfer instructions that customers receive with their invoices. These instructions should be clear and include all information necessary for customers to complete payments.
Email Configuration
Email functionality is critical for WHMCS operations, handling everything from invoice notifications to support ticket communications. Proper email configuration ensures reliable delivery and professional presentation of automated communications.
SMTP Configuration
SMTP configuration provides more reliable email delivery than standard PHP mail functions. Most VPS providers offer SMTP services, or you can use third-party services like SendGrid or Amazon SES.
Configure SMTP settings in WHMCS:
Navigate to Configuration > System Settings > General Settings and locate the Mail tab. Select SMTP as the mail method and enter your SMTP server details:
•SMTP Host: Your SMTP server address
•SMTP Port: Typically 587 for TLS or 465 for SSL
•SMTP Username: Your SMTP account username
•SMTP Password: Your SMTP account password
•Encryption: Select TLS or SSL based on your server requirements
Test email functionality using WHMCS’s built-in email testing feature. Send test emails to verify that configuration is correct and emails are delivered properly.
Email Template Customization
WHMCS includes comprehensive email templates for various communications including invoice notifications, welcome messages, and support responses. Customize these templates to match your brand and communication style.
Access email templates through Configuration > System Settings > Email Templates. Review and customize key templates including:
•Invoice Created: Sent when new invoices are generated
•Payment Confirmation: Sent after successful payments
•Account Welcome: Sent to new customers after account creation
•Support Ticket: Various templates for support communications
Customize email templates with your company branding, appropriate language, and any additional information relevant to your customers. Use WHMCS merge fields to personalize emails with customer-specific information.
Email Piping Setup
Email piping allows customers to create support tickets by sending emails to designated addresses. This functionality improves customer service by providing multiple channels for support requests.
Configure email piping by:
Creating dedicated email addresses for support tickets (e.g., support@yourdomain.com). Configure these addresses to forward emails to WHMCS using pipe scripts or IMAP importing.
Set up the pipe script on your server to process incoming emails and create corresponding support tickets in WHMCS. The pipe script is included with WHMCS and requires proper configuration for your server environment.
Test email piping functionality by sending test emails to configured addresses and verifying that tickets are created correctly in WHMCS.
Product and Service Configuration
Configuring products and services is essential for generating revenue through WHMCS. The platform supports various product types including hosting packages, domain registrations, and custom services.
Hosting Product Setup
Hosting products represent the core offering for most WHMCS users. These products can be configured with various billing cycles, pricing options, and automated provisioning features.
Create hosting products through Configuration > System Settings > Products/Services. Define product groups to organize related offerings and create individual products within each group.
Configure hosting product details including:
•Product Name: Clear, descriptive name for the hosting package
•Description: Detailed description of features and benefits
•Pricing: Set up pricing for various billing cycles (monthly, quarterly, annually)
•Resource Limits: Define disk space, bandwidth, and other resource allocations
Domain Registration Setup
Domain registration services provide additional revenue opportunities and convenience for customers. WHMCS integrates with numerous domain registrars including Enom, ResellerClub, and Namecheap.
Configure domain registrar integration by:
Obtaining registrar API credentials from your chosen domain provider. These credentials allow WHMCS to automatically process domain registrations, renewals, and management functions.
Configure the registrar module in WHMCS through Configuration > System Settings > Domain Registrars. Enter API credentials and configure settings specific to your registrar.
Set up domain pricing for various TLDs (Top Level Domains) through Configuration > System Settings > Domain Pricing. Configure pricing for registrations, renewals, and transfers for each TLD you plan to offer.
Custom Product Configuration
Custom products allow businesses to offer specialized services that don’t fit standard hosting or domain categories. These might include SSL certificates, backup services, or consulting offerings.
Create custom products with appropriate billing configurations and descriptions. Custom products can be configured for one-time billing, recurring charges, or usage-based pricing depending on business requirements.
Server Integration
Server integration enables automated provisioning and management of hosting accounts. WHMCS supports integration with popular control panels including cPanel, Plesk, and DirectAdmin.
cPanel Integration
cPanel integration is one of the most common server configurations for WHMCS installations. This integration allows automatic account creation, suspension, and termination based on customer actions and payment status.
Configure cPanel integration by:
Adding your cPanel server to WHMCS through Configuration > System Settings > Servers. Enter server connection details including:
•Server Name: Descriptive name for identification
•Hostname: Server hostname or IP address
•Username: cPanel root or reseller username
•Password: Corresponding password for server access
Test server connectivity using WHMCS’s built-in testing functionality. Successful connection testing confirms that WHMCS can communicate with your cPanel server for automated operations.
Configure hosting products to use the cPanel server for provisioning. This links product orders to automatic account creation on the specified server.
WHM Configuration
Web Host Manager (WHM) integration provides additional control over cPanel server management. Configure WHM access to enable features like package management and server monitoring.
Enter WHM access credentials in the server configuration, ensuring that the specified account has appropriate privileges for account management operations.
Alternative Control Panel Integration
WHMCS supports various control panels beyond cPanel. Plesk integration provides similar functionality for Windows and Linux servers running Plesk control panel.
DirectAdmin integration offers another alternative for Linux-based hosting environments. Configure these integrations using similar processes to cPanel, with control panel-specific settings and requirements.
Common Issues and Solutions
Even with careful preparation and execution, WHMCS installations can encounter various issues. Understanding common problems and their solutions helps ensure smooth installation and operation. This section addresses frequently encountered issues and provides practical solutions for resolving them.
Installation-Related Issues
Installation problems often stem from server configuration issues, missing requirements, or incorrect file permissions. Identifying and resolving these issues quickly prevents delays in getting WHMCS operational.
PHP Extension Missing Errors
One of the most common installation issues involves missing PHP extensions required by WHMCS. The installation script performs comprehensive checks and will identify missing extensions before allowing installation to proceed.
If the ionCube Loader is missing or incompatible, installation cannot proceed. Resolve this by downloading the appropriate ionCube Loader version for your PHP installation from the ionCube website. Install the loader according to the provided instructions and restart your web server.
Missing cURL extension prevents WHMCS from communicating with external services including payment gateways and domain registrars. Install cURL using your server’s package manager:
Bash
# For Ubuntu/Debian systems sudo apt-get install php-curl # For CentOS/RHEL systems sudo yum install php-curl
After installing missing extensions, restart your web server and verify installation using the PHP info script created earlier.
Database Connection Failures
Database connection issues prevent WHMCS installation from proceeding and can cause operational problems after installation. Common causes include incorrect credentials, insufficient privileges, or network connectivity issues.
Verify database credentials by testing connection using command-line tools or PHP scripts. Ensure that the database user has all required privileges by attempting to create, alter, and drop test tables.
If using remote database servers, verify that firewall rules allow connections from the web server. Database servers should generally be configured to accept connections only from authorized IP addresses.
File Permission Problems
Incorrect file permissions can prevent WHMCS installation or cause operational issues after installation. The WHMCS installer checks for appropriate permissions and will identify problems before proceeding.
If permission errors are identified, correct them using appropriate tools:
Bash
# Set correct permissions for WHMCS files find /path/to/whmcs/ -type f -exec chmod 644 {} \; find /path/to/whmcs/ -type d -exec chmod 755 {} \; # Set write permissions for required directories chmod 755 /path/to/whmcs/attachments/ chmod 755 /path/to/whmcs/downloads/ chmod 755 /path/to/whmcs/templates_c/
Some server configurations may require different permissions. Consult your hosting provider’s documentation for specific permission requirements.
Memory Limit Exceeded Errors
PHP memory limit errors can occur during installation or operation if available memory is insufficient for WHMCS operations. Increase the PHP memory limit to resolve these issues.
Modify the PHP configuration file (php.ini) to increase the memory limit:
Plain Text
memory_limit = 256M
Alternatively, create a .htaccess file in the WHMCS directory with memory limit directives:
Plain Text
php_value memory_limit 256M
Restart your web server after making configuration changes to ensure they take effect.
Post-Installation Issues
Problems that occur after successful installation often relate to configuration issues, integration problems, or ongoing maintenance requirements.
Email Delivery Problems
Email delivery issues can prevent customers from receiving important notifications including invoices, payment confirmations, and support responses. These problems often stem from SMTP configuration issues or server reputation problems.
Test email functionality using WHMCS’s built-in email testing feature. If emails are not being delivered, verify SMTP configuration settings and test connectivity to your SMTP server.
Configure SPF, DKIM, and DMARC records for your domain to improve email deliverability and reduce the likelihood of emails being marked as spam.
Consider using dedicated email services like SendGrid or Amazon SES for improved deliverability, particularly if your server IP address has reputation issues.
Payment Gateway Integration Issues
Payment gateway problems can prevent customers from completing payments, directly impacting revenue. Common issues include incorrect API credentials, currency mismatches, or webhook configuration problems.
Verify payment gateway credentials by testing them directly with the gateway provider’s testing tools. Ensure that API keys are correctly entered in WHMCS and that test mode is properly configured.
Check currency settings to ensure compatibility between WHMCS and your payment gateway. Some gateways have restrictions on supported currencies or require specific currency codes.
Configure webhooks or IPN (Instant Payment Notification) settings to ensure that payment status updates are properly communicated between the gateway and WHMCS.
Server Integration Problems
Server integration issues can prevent automated account provisioning and management. These problems often relate to API connectivity, authentication, or control panel configuration.
Test server connectivity using WHMCS’s built-in testing functionality. Verify that API credentials are correct and that the server is accessible from your WHMCS installation.
Check firewall settings to ensure that WHMCS can communicate with your servers on required ports. cPanel typically uses port 2087 for SSL connections, while other control panels may use different ports.
Verify that server packages and configurations match the settings defined in WHMCS products. Mismatched configurations can prevent successful account provisioning.
Performance Issues
Performance problems can affect user experience and business operations. Common causes include database optimization needs, insufficient server resources, or inefficient configurations.
Monitor server resource usage to identify bottlenecks. High CPU usage, memory exhaustion, or disk I/O problems can all impact WHMCS performance.
Optimize database performance by implementing appropriate indexing, query optimization, and caching mechanisms. Regular database maintenance including optimization and cleanup can improve performance.
Consider implementing caching solutions like Redis or Memcached to reduce database load and improve response times for frequently accessed data.
Security Best Practices
Security is paramount for WHMCS installations due to the sensitive nature of customer data and financial information handled by the platform. Implementing comprehensive security measures protects both your business and your customers from various threats including data breaches, unauthorized access, and financial fraud.
Server-Level Security
Server security provides the foundation for protecting WHMCS installations. Comprehensive server hardening reduces attack surfaces and provides multiple layers of protection against various threats.
Operating System Hardening
Keep your server operating system updated with the latest security patches. Configure automatic updates for critical security patches while maintaining control over major system updates that might affect WHMCS operation.
Disable unnecessary services and remove unused software packages to reduce potential attack vectors. Every additional service running on your server represents a potential security risk that should be eliminated if not required.
Configure secure SSH access by disabling root login, changing default ports, and implementing key-based authentication. Use strong passwords or SSH keys for all user accounts and implement account lockout policies for failed login attempts.
Firewall Configuration
Implement comprehensive firewall rules that restrict access to only necessary ports and services. A properly configured firewall blocks unauthorized access attempts and reduces exposure to automated attacks.
Configure firewall rules to allow only essential traffic:
•Port 80 (HTTP) and 443 (HTTPS) for web traffic
•Port 22 (SSH) for administrative access, restricted to specific IP addresses when possible
•Database ports should never be accessible from external networks
Use fail2ban or similar intrusion prevention systems to automatically block IP addresses that exhibit suspicious behavior including repeated failed login attempts or scanning activities.
SSL/TLS Configuration
Implement strong SSL/TLS encryption for all WHMCS communications. Modern browsers require HTTPS for secure operations, and customers expect encrypted connections when handling financial information.
Use strong SSL certificates from reputable certificate authorities. While Let’s Encrypt provides free certificates suitable for most installations, commercial certificates may be preferred for larger businesses or those requiring extended validation.
Configure SSL/TLS settings to use modern encryption protocols and disable outdated, vulnerable protocols. Implement HTTP Strict Transport Security (HSTS) to prevent protocol downgrade attacks.
Application-Level Security
WHMCS-specific security measures protect against application-level vulnerabilities and ensure that sensitive data remains secure during processing and storage.
Admin Area Security
Protect the WHMCS admin area with additional security measures beyond standard login credentials. The admin area provides access to all system functions and sensitive customer data, making it a high-value target for attackers.
Implement two-factor authentication (2FA) for all administrator accounts. WHMCS supports various 2FA methods including time-based one-time passwords (TOTP) and SMS-based authentication.
Restrict admin area access to specific IP addresses when possible. This prevents unauthorized access even if login credentials are compromised. Configure IP restrictions through WHMCS security settings or server-level access controls.
Use strong, unique passwords for all administrator accounts. Passwords should be at least 12 characters long and include a combination of uppercase and lowercase letters, numbers, and special characters.
Database Security
Protect the WHMCS database with appropriate security measures including access controls, encryption, and monitoring. The database contains all sensitive customer information and must be secured accordingly.
Restrict database access to only necessary accounts and IP addresses. Database connections should be limited to localhost or specific application servers, never allowing public internet access.
Implement database encryption for sensitive data including customer payment information and personal details. WHMCS supports various encryption options for protecting stored data.
Regular database backups are essential for security and business continuity. Implement automated backup procedures with secure storage and regular restoration testing.
File System Security
Protect WHMCS files and directories with appropriate permissions and access controls. Incorrect file permissions can expose sensitive configuration information or allow unauthorized modifications.
Set the configuration.php file to 400 permissions (readable by owner only) to protect database credentials and other sensitive settings. This file contains critical information that must be protected from unauthorized access.
Regularly monitor file system integrity using tools like AIDE or Tripwire to detect unauthorized modifications. File integrity monitoring can identify security breaches or system compromises.
Regular Security Updates
Maintain current WHMCS versions and apply security updates promptly. WHMCS regularly releases updates that address security vulnerabilities and improve system protection.
Subscribe to WHMCS security notifications to receive immediate alerts about critical security updates. Implement update procedures that allow for rapid deployment of security patches while maintaining system stability.
Test updates in staging environments before applying to production systems. This testing ensures that updates don’t introduce operational issues while providing necessary security improvements.
Monitoring and Incident Response
Implement comprehensive monitoring systems to detect security incidents and respond appropriately to potential threats. Early detection and rapid response minimize the impact of security breaches.
Log Monitoring
Configure comprehensive logging for all WHMCS activities including login attempts, administrative actions, and system errors. Centralized log management provides visibility into system activities and helps identify suspicious behavior.
Monitor logs for indicators of compromise including:
•Repeated failed login attempts
•Unusual administrative activities
•Unexpected system errors or warnings
•Suspicious file access patterns
Implement automated alerting for critical security events to ensure rapid response to potential incidents.
Backup and Recovery
Implement comprehensive backup procedures that protect both WHMCS files and databases. Regular backups provide recovery options in case of security incidents, system failures, or data corruption.
Test backup restoration procedures regularly to ensure that backups are functional and complete. Backup systems that haven’t been tested may fail when needed most.
Store backups in secure, off-site locations to protect against local disasters or security breaches that might affect primary systems.
Conclusion
Installing WHMCS on a VPS represents a significant step toward establishing a professional billing and automation system for your hosting business. This comprehensive guide has walked you through every aspect of the installation process, from initial planning and system requirements through post-installation configuration and security implementation.
The success of your WHMCS installation depends on careful attention to detail during each phase of the process. Proper preparation, including thorough system requirements verification and security planning, prevents common installation issues and ensures optimal performance from the start. The step-by-step installation process, when followed carefully, provides a solid foundation for your billing operations.
Post-installation configuration is equally important, as it transforms a basic WHMCS installation into a fully functional business management system. Payment gateway integration, email configuration, and product setup are essential for generating revenue and providing excellent customer service. Server integration enables automation that reduces manual workload and improves operational efficiency.
Security considerations cannot be overlooked in any WHMCS installation. The sensitive nature of customer data and financial information handled by WHMCS demands comprehensive security measures at both server and application levels. Regular security updates, monitoring, and incident response procedures protect your business and customers from various threats.
Common issues and their solutions, as outlined in this guide, provide troubleshooting resources for problems that may arise during installation or operation. Understanding these issues and their resolutions helps maintain system stability and minimizes downtime that could impact business operations.
The investment in time and effort required for proper WHMCS installation pays dividends through improved business efficiency, automated operations, and professional customer interactions. A well-configured WHMCS system handles routine billing tasks, manages customer communications, and provides detailed reporting that supports business growth and decision-making.
As your business grows, WHMCS scales to accommodate increased customer bases, additional services, and expanded operations. The modular nature of WHMCS allows for gradual expansion of functionality through addon modules and integrations that extend the platform’s capabilities.
Regular maintenance, including updates, backups, and security monitoring, ensures that your WHMCS installation continues to operate effectively and securely. Staying current with WHMCS releases and security best practices protects your investment and maintains customer trust.
The comprehensive approach outlined in this guide provides the foundation for a successful WHMCS installation that serves your business needs effectively. By following these detailed instructions and implementing recommended best practices, you create a robust billing and automation system that supports business growth and customer satisfaction.What is WHMCS?
WHMCS (Web Host Manager Complete Solution) is a powerful billing and automation platform designed specifically for web hosting companies, domain registrars, and online service providers. This comprehensive software solution streamlines business operations by automating billing processes, managing customer accounts, and providing integrated support ticket systems.
The platform serves as the backbone for thousands of hosting businesses worldwide, offering features that range from automated invoice generation to domain management and server provisioning. WHMCS eliminates the need for multiple separate systems by combining billing, customer management, and support functions into a single, cohesive platform.
For hosting providers, WHMCS represents more than just billing software. It’s a complete business management solution that handles recurring payments, manages product lifecycles, and provides detailed reporting capabilities. The software integrates seamlessly with popular payment gateways like PayPal, Stripe, and various credit card processors, ensuring smooth financial transactions for both businesses and their customers.
The automation capabilities of WHMCS extend beyond simple billing. The platform can automatically provision hosting accounts, send welcome emails, manage domain registrations, and even handle account suspensions for non-payment. This level of automation significantly reduces manual workload and minimizes human error in critical business processes.
WHMCS also provides extensive customization options through its template system and addon modules. Businesses can tailor the client area interface to match their brand identity and add specialized functionality through third-party modules or custom development. The platform supports multiple languages and currencies, making it suitable for businesses operating in international markets.
Why Choose VPS for WHMCS?
Virtual Private Server (VPS) hosting represents the ideal middle ground between shared hosting limitations and dedicated server costs for WHMCS installations. Understanding why VPS hosting is particularly well-suited for WHMCS requires examining both the software’s requirements and the unique benefits that VPS environments provide.
WHMCS handles sensitive financial data, customer information, and business-critical operations that demand reliable performance and robust security measures. Shared hosting environments often lack the resources and control necessary to properly secure and optimize WHMCS installations. While dedicated servers provide maximum control and resources, they typically exceed the requirements and budget of most small to medium-sized hosting businesses.
VPS hosting bridges this gap by offering dedicated resources within a virtualized environment. Each VPS operates independently with its own allocated CPU, RAM, and storage resources, ensuring that WHMCS performance remains consistent regardless of other users’ activities on the same physical server. This isolation is crucial for maintaining the responsiveness that customers expect when accessing billing portals and support systems.
The scalability of VPS hosting aligns perfectly with growing hosting businesses. As customer bases expand and transaction volumes increase, VPS resources can be upgraded without the complexity and downtime associated with server migrations. This flexibility allows businesses to start with modest resource allocations and scale up as needed, optimizing costs while maintaining performance.
Security considerations make VPS hosting particularly attractive for WHMCS installations. The isolated environment provides better protection against security vulnerabilities that might affect other users on shared hosting platforms. VPS users typically receive root access, enabling the implementation of custom security measures, firewall configurations, and monitoring systems that are essential for protecting sensitive billing data.
Performance optimization becomes significantly easier with VPS hosting. WHMCS administrators can fine-tune server configurations, optimize database settings, and implement caching mechanisms without restrictions imposed by shared hosting providers. This level of control is essential for maintaining fast page load times and smooth user experiences, particularly during peak usage periods.
Cost-effectiveness represents another compelling reason to choose VPS hosting for WHMCS. While more expensive than shared hosting, VPS solutions provide substantially better value than dedicated servers for most WHMCS installations. The predictable monthly costs and ability to scale resources as needed make VPS hosting an economically sound choice for growing businesses.
System Requirements
Understanding WHMCS system requirements is crucial for ensuring a successful installation and optimal performance. The software has specific technical prerequisites that must be met before installation can proceed. These requirements have evolved with recent WHMCS versions, particularly regarding PHP compatibility and security standards.
Minimum Hardware Requirements
The foundation of any WHMCS installation begins with adequate hardware resources. While WHMCS can technically run on modest hardware configurations, real-world usage demands more substantial resources to maintain acceptable performance levels.
CPU Requirements: WHMCS performs best with modern multi-core processors. A minimum of 2 CPU cores is recommended for small installations, while larger deployments benefit from 4 or more cores. The software’s database operations and concurrent user handling capabilities scale directly with available CPU resources.
Memory (RAM) Requirements: Memory allocation significantly impacts WHMCS performance, particularly during peak usage periods. A minimum of 2GB RAM is recommended for basic installations, but 4GB or more provides better performance margins. Installations serving hundreds of active customers should consider 8GB or more to accommodate database caching and concurrent user sessions.
Storage Requirements: WHMCS requires a minimum of 250MB disk space for the core installation files. However, practical deployments need significantly more space for databases, log files, email attachments, and system backups. A minimum of 10GB available storage is recommended, with SSD storage preferred for better database performance.
Network Requirements: Reliable internet connectivity with adequate bandwidth is essential for WHMCS operations. The platform regularly communicates with payment gateways, domain registrars, and external services. A stable connection with at least 100Mbps bandwidth ensures smooth operations for most installations.
Software Requirements
WHMCS operates within a traditional LAMP (Linux, Apache, MySQL, PHP) environment, though it supports various configurations within this framework. Recent versions have updated requirements that reflect modern security standards and performance optimizations.
Operating System: Linux distributions provide the most stable and secure foundation for WHMCS installations. Ubuntu Server, CentOS, and Debian are popular choices that offer excellent compatibility and long-term support. While WHMCS can run on Windows servers, Linux environments are strongly recommended for production deployments.
Web Server: Apache HTTP Server version 2.4 or higher provides the most tested and compatible environment for WHMCS. The mod_rewrite module is essential for proper URL handling and should be enabled. While Nginx can work with WHMCS, Apache remains the recommended choice due to extensive testing and documentation.
PHP Requirements: Current WHMCS versions require PHP 8.1 or higher, representing a significant update from previous requirements. This change reflects the platform’s commitment to modern security standards and performance improvements. PHP 8.2 and 8.3 are also supported and recommended for new installations.
The PHP installation must include several essential extensions that WHMCS relies on for core functionality. The cURL extension with SSL support is mandatory for payment gateway communications and external API interactions. The GD2 image library enables WHMCS to generate and manipulate images for invoices and reports. IMAP support is required for email piping functionality that allows support tickets to be created from incoming emails.
Database Requirements: MySQL 5.7 or higher, or MariaDB 10.2 or higher, provides the database foundation for WHMCS. MySQL 8.0 is recommended for new installations due to improved performance and security features. The database user must have comprehensive privileges including CREATE, ALTER, DROP, SELECT, INSERT, UPDATE, DELETE, and INDEX permissions.
ionCube Loader: WHMCS uses ionCube encoding to protect its source code, making the ionCube Loader a mandatory requirement. The required version varies based on the PHP version in use. For PHP 8.1, ionCube Loader 12.0.1 or higher is required. PHP 8.2 requires version 13.0.2 or higher, while PHP 8.3 needs version 14.4.0 or higher.
Security Requirements
Modern WHMCS installations must meet enhanced security standards to protect sensitive customer data and financial information. These requirements go beyond basic software compatibility to encompass encryption, access controls, and monitoring capabilities.
SSL/TLS Requirements: WHMCS installations must use SSL certificates to encrypt data transmission between clients and the server. Modern browsers require TLS 1.2 or higher for secure connections. Let’s Encrypt provides free SSL certificates that are perfectly suitable for WHMCS installations, though commercial certificates may be preferred for larger businesses.
File Permissions: Proper file permissions are critical for WHMCS security. The configuration file (configuration.php) should be set to 400 (read-only for owner) to prevent unauthorized access to database credentials and other sensitive settings. Writable directories like attachments, downloads, and templates_c require 755 permissions to function properly while maintaining security.
Firewall Configuration: VPS installations should implement firewall rules that restrict access to essential ports only. SSH access should be limited to specific IP addresses when possible, and database ports should never be exposed to the public internet. Web traffic should be restricted to ports 80 and 443 for HTTP and HTTPS respectively.
Performance Optimization Requirements
Achieving optimal WHMCS performance requires attention to various system-level configurations that go beyond meeting minimum requirements. These optimizations become increasingly important as customer bases grow and transaction volumes increase.
PHP Configuration: PHP memory limits should be set to at least 128MB, though 256MB or higher is recommended for larger installations. The max_execution_time should be set to at least 300 seconds to accommodate lengthy operations like database backups and bulk operations. File upload limits should be configured to allow reasonable attachment sizes for support tickets and documentation.
Database Optimization: MySQL configuration should be tuned for WHMCS workloads, which typically involve many small transactions rather than large data processing operations. The innodb_buffer_pool_size should be set to approximately 70% of available RAM on dedicated database servers. Query caching can improve performance for frequently accessed data.
Caching Systems: Implementing caching mechanisms significantly improves WHMCS performance. Opcache should be enabled for PHP to cache compiled scripts. Redis or Memcached can provide session storage and data caching capabilities that reduce database load and improve response times.
Pre-Installation Checklist
Proper preparation is essential for a smooth WHMCS installation process. This comprehensive checklist ensures that all prerequisites are met and potential issues are identified before beginning the installation. Taking time to complete these preparatory steps prevents common installation problems and reduces the likelihood of post-installation complications.
License and Download Preparation
The first step in any WHMCS installation involves obtaining a valid license and downloading the software. WHMCS operates on a licensing model that requires verification during installation, making proper license preparation crucial for success.
License Acquisition: WHMCS licenses can be purchased directly from WHMCS.com or through authorized resellers. Each license is tied to a specific domain name and cannot be transferred between domains without proper procedures. When purchasing a license, ensure that the domain name matches exactly with your intended installation domain, including any subdomain specifications.
Account Setup: Creating an account in the WHMCS Members Area provides access to downloads, documentation, and support resources. This account will be essential for future updates and accessing additional resources. Verify that the email address associated with your account is accessible and monitored, as important communications regarding updates and security notices will be sent to this address.
Download Process: The WHMCS download package contains all necessary files for installation. Always download the latest stable version unless specific compatibility requirements dictate otherwise. The download package is provided as a ZIP file that contains the complete WHMCS directory structure and all required files.
File Integrity Verification: After downloading, verify the integrity of the ZIP file to ensure it wasn’t corrupted during transfer. WHMCS provides checksums for their download packages that can be used to verify file integrity. This step prevents installation issues caused by corrupted files.
Server Environment Verification
Confirming that your VPS environment meets all WHMCS requirements prevents installation failures and ensures optimal performance from the start. This verification process should be thorough and systematic to identify any potential issues before they impact the installation.
PHP Version Verification: Use the command line or create a PHP info file to verify that PHP 8.1 or higher is installed and active. The PHP version must be consistent across both command line and web server environments. Some systems may have multiple PHP versions installed, requiring specific configuration to ensure WHMCS uses the correct version.
Extension Availability: Create a comprehensive list of all required PHP extensions and verify their installation status. The php -m command provides a list of installed modules, while phpinfo() displays detailed extension information including version numbers and configuration settings. Pay particular attention to cURL, GD2, IMAP, and PDO extensions as these are critical for WHMCS functionality.
ionCube Loader Installation: Verify that the ionCube Loader is installed and compatible with your PHP version. The ionCube Loader must be loaded before other PHP extensions to function properly. Check both command line and web server PHP configurations to ensure consistency.
Database Connectivity: Test database connectivity using both command line tools and PHP scripts. Verify that the database user has all required privileges and can perform CREATE, ALTER, and DROP operations. Test connectivity from the web server to ensure that any firewall rules or network configurations don’t interfere with database access.
Web Server Configuration: Confirm that Apache is properly configured with mod_rewrite enabled. Test URL rewriting functionality to ensure that WHMCS’s friendly URLs will work correctly. Verify that the web server can write to necessary directories and that file permissions are set appropriately.
Security Preparation
Implementing security measures before installation provides better protection than attempting to secure the system after WHMCS is already running. This proactive approach ensures that sensitive data is protected from the moment the system becomes operational.
SSL Certificate Installation: Install and configure SSL certificates before beginning the WHMCS installation. This ensures that all initial configuration and testing occurs over encrypted connections. Test the SSL configuration using online tools to verify proper implementation and identify any potential issues.
Firewall Configuration: Implement comprehensive firewall rules that restrict access to only necessary ports and services. SSH access should be limited to specific IP addresses when possible. Database ports should never be accessible from the public internet. Web traffic should be restricted to standard HTTP and HTTPS ports.
User Account Security: Create dedicated user accounts for WHMCS operations rather than using root or administrator accounts. These accounts should have minimal privileges necessary for operation. Implement strong password policies and consider using SSH key authentication for administrative access.
Backup Strategy Planning: Develop and test backup procedures before installation begins. This includes both file system backups and database backup procedures. Automated backup systems should be configured and tested to ensure reliable data protection from day one.
Domain and DNS Configuration
Proper domain and DNS configuration ensures that WHMCS will be accessible to users and that all integrated services function correctly. This preparation prevents connectivity issues that could impact customer access and business operations.
Domain Registration Verification: Confirm that your domain is properly registered and that you have administrative control over DNS settings. The domain should be fully propagated and accessible from multiple locations before beginning installation.
DNS Record Configuration: Configure appropriate DNS records including A records for the main domain and any subdomains that will be used. Consider implementing CNAME records for common subdomains like ‘www’ and ‘billing’. MX records should be configured if email services will be hosted on the same server.
Subdomain Planning: Many WHMCS installations use subdomains like billing.yourdomain.com or client.yourdomain.com. Plan these subdomains in advance and configure DNS records accordingly. Ensure that SSL certificates cover all planned subdomains.
Email Configuration: Plan email configuration including any email accounts that will be used for WHMCS operations. This includes support email addresses, billing notifications, and administrative communications. Configure SPF, DKIM, and DMARC records to improve email deliverability.
Step-by-Step Installation Process
The WHMCS installation process consists of seven main steps that must be completed in sequence. Each step builds upon the previous one, and skipping or incorrectly completing any step can result in installation failure or operational issues. This section provides detailed instructions for each step, including screenshots and troubleshooting guidance.
Step 1: Purchase License and Download WHMCS
The first step in installing WHMCS involves obtaining a valid license and downloading the software package. This process requires careful attention to licensing terms and proper file handling to ensure a successful installation.
Purchasing Your WHMCS License
WHMCS licenses are available through the official WHMCS website or authorized resellers. The licensing model is based on the number of active clients in your system, with pricing tiers that scale with business growth. When purchasing a license, you’ll need to specify the domain name where WHMCS will be installed, as licenses are domain-specific and cannot be easily transferred.
The license purchase process requires providing accurate business information and contact details. This information is used for license verification and important communications regarding updates and security notices. Ensure that the email address provided is actively monitored, as it will be used for license-related communications and account recovery if needed.
After purchase completion, you’ll receive a license key via email. This key is essential for the installation process and should be stored securely. The license key is unique to your installation and should never be shared or used on multiple domains without proper authorization.
Accessing the WHMCS Members Area
Once your license is purchased, you’ll gain access to the WHMCS Members Area, which serves as your central hub for downloads, documentation, and support resources. The Members Area login credentials are typically sent via email after license purchase, though some reseller purchases may require additional steps to gain access.
The Members Area provides access to the latest WHMCS releases, including both stable versions and beta releases for testing purposes. Always download the latest stable version unless specific compatibility requirements dictate otherwise. Beta versions should only be used for testing and development purposes, never for production installations.
Downloading WHMCS Files
Navigate to the Downloads section within the Members Area and locate the “Full Release” download option. This package contains all necessary files for a complete WHMCS installation. The download is provided as a ZIP file that typically ranges from 50-100MB depending on the version.
Download the file to a secure location on your local computer. Avoid downloading directly to the server, as this can expose the installation files to potential security risks during the download process. The local download also allows for file integrity verification before upload.
File Integrity Verification
After downloading, verify the integrity of the ZIP file to ensure it wasn’t corrupted during transfer. WHMCS provides MD5 or SHA checksums for their download packages. Use appropriate tools on your operating system to verify these checksums match the downloaded file.
On Linux systems, use the md5sum or sha256sum commands to generate checksums for comparison. On Windows, PowerShell’s Get-FileHash cmdlet provides similar functionality. Mac users can use the md5 or shasum commands in Terminal.
If checksums don’t match, re-download the file before proceeding. Corrupted installation files can cause various issues during installation and operation, making this verification step crucial for success.
Step 2: Verify System Requirements
Before proceeding with file uploads and installation, thoroughly verify that your VPS environment meets all WHMCS requirements. This verification process prevents installation failures and ensures optimal performance from the start.
PHP Version and Extension Verification
Create a PHP information file to verify your server’s PHP configuration. Create a file named phpinfo.php in your web server’s document root with the following content:
PHP
<?php phpinfo(); ?>
Access this file through your web browser to view comprehensive PHP configuration information. Verify that PHP 8.1 or higher is active and that all required extensions are installed and enabled.
Pay particular attention to the following extensions:
•cURL: Required for payment gateway communications and external API calls
•GD2: Necessary for image generation and manipulation
•IMAP: Required for email piping functionality
•ionCube Loader: Essential for running WHMCS’s encoded files
•JSON: Required for data processing and API communications
•PDO and PDO_MySQL: Necessary for database connectivity
•Reflection: Required for various WHMCS operations
•XML: Necessary for data processing and external integrations
Database Connectivity Testing
Test database connectivity using both command-line tools and PHP scripts. Create a simple PHP script to verify database connectivity:
PHP
<?php $host = ‘localhost’; $username = ‘your_db_user’; $password = ‘your_db_password’; $database = ‘your_db_name’; try { $pdo = new PDO(“mysql:host=$host;dbname=$database”, $username, $password); echo “Database connection successful!”; } catch(PDOException $e) { echo “Connection failed: ” . $e->getMessage(); } ?>
Verify that the database user has all necessary privileges by attempting to create, alter, and drop test tables. The user must have comprehensive permissions including CREATE, ALTER, DROP, SELECT, INSERT, UPDATE, DELETE, and INDEX privileges.
ionCube Loader Verification
Verify ionCube Loader installation and compatibility with your PHP version. The ionCube Loader must be properly installed and loaded before other PHP extensions. Check the PHP information page for ionCube Loader details, including version number and configuration.
If ionCube Loader is not installed or is incompatible with your PHP version, install the appropriate version before proceeding. ionCube provides installation packages for various operating systems and PHP versions through their website.
Web Server Configuration Check
Verify that Apache is properly configured with necessary modules enabled. The mod_rewrite module is essential for WHMCS’s friendly URL functionality. Test mod_rewrite by creating a simple .htaccess file with rewrite rules and verifying that they function correctly.
Check that the web server can write to directories that will require write permissions during installation. These include the attachments, downloads, and templates_c directories within the WHMCS installation.
Step 3: Upload Files to Your Server
Uploading WHMCS files to your server requires careful attention to file integrity and proper directory structure. The upload process can be completed using various methods, with cPanel File Manager and FTP being the most common approaches.
Preparing the Upload Directory
Determine the appropriate directory for your WHMCS installation. Most installations use the public_html directory for main domain installations or a subdirectory for subdomain installations. Ensure that the target directory has appropriate permissions and is accessible through the web server.
Clean the target directory of any existing files that might conflict with the WHMCS installation. While WHMCS can coexist with other applications, it’s best practice to use a clean directory to avoid potential conflicts.
Using cPanel File Manager
cPanel’s File Manager provides a user-friendly interface for uploading and extracting WHMCS files directly on the server. This method is often preferred because it eliminates the need for separate FTP software and handles file extraction automatically.
Access cPanel and navigate to the File Manager interface. Select the appropriate directory for your installation, typically public_html for main domain installations. Use the Upload function to transfer the WHMCS ZIP file to the server.
After upload completion, locate the ZIP file in the File Manager and right-click to access the Extract option. Choose the extraction destination carefully, ensuring that files are extracted to the correct directory. The extraction process creates a ‘whmcs’ folder containing all installation files.
FTP Upload Method
For users preferring FTP clients or those without cPanel access, FTP upload provides an alternative method for transferring WHMCS files. This method requires extracting the ZIP file locally before upload, which allows for file verification before transfer.
Extract the WHMCS ZIP file on your local computer, creating a folder structure with all necessary files. Use an FTP client like FileZilla, WinSCP, or similar software to connect to your server. Configure the FTP client for binary mode transfer to ensure file integrity during upload.
Upload the entire WHMCS directory structure to your server, maintaining the original folder hierarchy. This process may take several minutes depending on connection speed and file sizes. Verify that all files transferred successfully by comparing local and remote file counts.
File Permission Configuration
After uploading, configure appropriate file permissions for WHMCS operation. Most files should have 644 permissions (readable by owner and group, readable by others), while directories should have 755 permissions (readable and executable by all, writable by owner).
Specific directories require write permissions for WHMCS operation:
•attachments: Set to 755 or 777 depending on server configuration
•downloads: Set to 755 or 777 for file storage
•templates_c: Set to 755 or 777 for template compilation
The configuration.php file, which will be created during installation, should be set to 400 permissions (readable by owner only) after installation completion for security purposes.
Directory Structure Verification
Verify that the uploaded WHMCS directory structure is complete and intact. The main WHMCS directory should contain subdirectories including admin, assets, includes, lang, modules, resources, templates, and vendor, among others.
Check that critical files are present, including index.php in the main directory and various PHP files throughout the directory structure. Missing files can cause installation failures or operational issues later.
Step 4: Create WHMCS Database
Database creation and configuration is a critical step that requires careful attention to user privileges and security settings. The database will store all WHMCS data, including customer information, billing records, and system configurations.
Database Creation Methods
Most VPS environments provide multiple methods for database creation, including cPanel interfaces, phpMyAdmin, and command-line tools. Choose the method that you’re most comfortable with, ensuring that you have administrative access to create databases and users.
Using cPanel MySQL Databases
cPanel’s MySQL Databases interface provides a straightforward method for creating WHMCS databases. Access cPanel and navigate to the MySQL Databases section under the Databases category.
Create a new database with a descriptive name that clearly identifies it as the WHMCS database. Database names are typically prefixed with your cPanel username, resulting in names like “username_whmcs” or “username_billing”. Record the complete database name as it will be needed during installation.
After database creation, create a dedicated database user for WHMCS operations. Use a strong password that combines uppercase and lowercase letters, numbers, and special characters. The password should be at least 12 characters long and unique to this database user.
Add the newly created user to the WHMCS database with full privileges. WHMCS requires comprehensive database permissions including SELECT, INSERT, UPDATE, DELETE, CREATE, ALTER, DROP, and INDEX privileges. Grant all privileges to ensure proper operation.
Command Line Database Creation
For users comfortable with command-line interfaces, MySQL can be accessed directly through SSH. This method provides more control over database creation and user configuration.
Connect to your server via SSH and access MySQL using the root account or another account with database creation privileges:
Bash
mysql -u root -p
Create the WHMCS database:
SQL
CREATE DATABASE whmcs_database CHARACTER SET utf8mb4 COLLATE utf8mb4_unicode_ci;
Create a dedicated database user:
SQL
CREATE USER ‘whmcs_user’@’localhost’ IDENTIFIED BY ‘strong_password_here’;
Grant necessary privileges:
SQL
GRANT ALL PRIVILEGES ON whmcs_database.* TO ‘whmcs_user’@’localhost’; FLUSH PRIVILEGES;
Database Security Configuration
Configure database security settings to protect sensitive WHMCS data. Ensure that the database server is not accessible from external networks unless specifically required. Database connections should be restricted to localhost or specific IP addresses.
Implement regular database backup procedures before proceeding with installation. Automated backup systems should be configured to create regular snapshots of the database, allowing for recovery in case of data loss or corruption.
Consider implementing database encryption for additional security, particularly if the VPS is hosted in shared environments. MySQL supports various encryption options that can protect data at rest.
Connection Testing
Test database connectivity using the credentials created for WHMCS. Create a simple PHP script to verify that the database connection works correctly:
PHP
<?php $host = ‘localhost’; $username = ‘whmcs_user’; $password = ‘your_password’; $database = ‘whmcs_database’; try { $pdo = new PDO(“mysql:host=$host;dbname=$database;charset=utf8mb4”, $username, $password); $pdo->setAttribute(PDO::ATTR_ERRMODE, PDO::ERRMODE_EXCEPTION); echo “Database connection successful!”; } catch(PDOException $e) { echo “Connection failed: ” . $e->getMessage(); } ?>
Successful connection testing confirms that the database is properly configured and ready for WHMCS installation.
Step 5: Run the WHMCS Installation Script
The WHMCS installation script automates the process of configuring the software and creating necessary database tables. This web-based installer guides you through the configuration process and performs initial system setup.
Accessing the Installation Script
Navigate to the WHMCS installation script using your web browser. The script is located at:
Plain Text
Replace “yourdomain.com” with your actual domain name and adjust the path if you installed WHMCS in a different directory. Ensure that you’re accessing the script over HTTPS to protect sensitive information during the installation process.
License Agreement Acceptance
The installation process begins with the WHMCS End User License Agreement (EULA). Read through the license terms carefully, as they govern your use of the software. The license agreement covers important topics including usage restrictions, support terms, and liability limitations.
Accept the license agreement to proceed with installation. This acceptance is legally binding and indicates your agreement to comply with WHMCS licensing terms.
System Requirements Check
The installer performs an automated check of your server environment to verify that all requirements are met. This check examines PHP version, required extensions, file permissions, and other critical configuration items.
Review the requirements check results carefully. Any items marked as failed or warnings must be addressed before proceeding. Common issues include missing PHP extensions, incorrect file permissions, or insufficient PHP memory limits.
If requirements check failures are identified, exit the installer and address the issues before attempting to continue. Proceeding with failed requirements can result in installation failure or operational problems later.
Database Configuration
Enter the database connection information created in Step 4. This includes:
•Database Host: Typically “localhost” for VPS installations
•Database Name: The complete database name created earlier
•Database Username: The database user created for WHMCS
•Database Password: The password for the database user
Test the database connection using the installer’s built-in testing function. This verification ensures that WHMCS can successfully connect to and interact with the database.
License Key Entry
Enter your WHMCS license key exactly as provided in your purchase confirmation email. License keys are case-sensitive and must be entered precisely. The installer will validate the license key against WHMCS servers, requiring an active internet connection.
License validation confirms that your key is valid and authorized for use on the specified domain. Invalid or expired licenses will prevent installation from proceeding.
Administrator Account Creation
Create the primary administrator account that will be used to manage WHMCS. This account has full administrative privileges and should be secured with a strong password.
Administrator account information includes:
•First Name and Last Name: Your personal information
•Email Address: A valid email address for administrative communications
•Username: A unique username for login purposes
•Password: A strong password meeting security requirements
The administrator email address will receive important system notifications and should be actively monitored. Choose a username that’s not easily guessable and avoid common names like “admin” or “administrator”.
Initial Configuration Settings
Configure basic WHMCS settings during installation:
•Company Name: Your business name as it will appear in WHMCS
•Company Email: Primary business email address
•Currency: Default currency for billing operations
•Country: Your business location
These settings can be modified after installation, but setting them correctly during installation saves configuration time later.
Installation Process Execution
After all information is entered and verified, the installer begins the actual installation process. This involves creating database tables, configuring initial settings, and setting up the WHMCS file structure.
The installation process typically takes several minutes to complete. Do not close the browser window or navigate away during this process, as interruption can result in incomplete installation requiring manual cleanup.
Monitor the installation progress and watch for any error messages. Successful installation will display a completion message with next steps for accessing your WHMCS installation.
Step 6: Delete Installation Directory
After successful installation completion, the installation directory must be removed for security purposes. This directory contains sensitive installation scripts that could be exploited if left accessible.
Security Importance
The installation directory contains scripts and files that provide detailed information about your server configuration and WHMCS setup. Leaving these files accessible creates potential security vulnerabilities that could be exploited by malicious users.
WHMCS will display security warnings and may restrict functionality if the installation directory remains present. Removing this directory is essential for proper system operation and security compliance.
Removal Methods
The installation directory can be removed using various methods depending on your server access level and preferences.
Using cPanel File Manager
Access cPanel File Manager and navigate to your WHMCS installation directory. Locate the “install” folder and select it for deletion. Confirm the deletion when prompted, ensuring that the entire directory and its contents are removed.
Verify that the directory has been completely removed by refreshing the File Manager view and confirming that the “install” folder is no longer present.
Using FTP Client
Connect to your server using an FTP client and navigate to the WHMCS installation directory. Select the “install” folder and delete it along with all its contents. Most FTP clients will prompt for confirmation before deleting directories.
Command Line Removal
For users with SSH access, the installation directory can be removed using command-line tools:
Bash
rm -rf /path/to/whmcs/install/
Replace “/path/to/whmcs/” with the actual path to your WHMCS installation directory.
Verification
After removal, verify that the installation directory is no longer accessible by attempting to access the installation script URL. The page should return a 404 error or similar indication that the directory no longer exists.
Step 7: Configure File Permissions
Proper file permissions are essential for WHMCS security and functionality. Incorrect permissions can create security vulnerabilities or prevent WHMCS from operating correctly.
Understanding File Permissions
Unix-style file permissions control who can read, write, and execute files and directories. WHMCS requires specific permissions for different files and directories to balance functionality with security.
Permission numbers represent different access levels:
•4: Read permission
•2: Write permission
•1: Execute permission
These numbers are combined to create permission values, with separate values for owner, group, and others.
WHMCS-Specific Permission Requirements
Configure the following permissions for WHMCS files and directories:
Configuration File: The configuration.php file contains sensitive database credentials and system settings. Set this file to 400 permissions (readable by owner only) to prevent unauthorized access:
Bash
chmod 400 configuration.php
Writable Directories: Several directories require write permissions for WHMCS operation:
Bash
chmod 755 attachments/ chmod 755 downloads/ chmod 755 templates_c/
Some server configurations may require 777 permissions for these directories, though 755 is preferred for security reasons.
General File Permissions: Most WHMCS files should have 644 permissions:
Bash
find /path/to/whmcs/ -type f -exec chmod 644 {} \;
Directory Permissions: Directories should generally have 755 permissions:
Bash
find /path/to/whmcs/ -type d -exec chmod 755 {} \;
Permission Verification
After setting permissions, verify that WHMCS can access necessary files and directories. Log into the WHMCS admin area and check for any permission-related error messages.
Test file upload functionality in areas like support ticket attachments to ensure that writable directories are properly configured.
Ongoing Permission Management
Implement procedures for maintaining proper permissions during updates and modifications. WHMCS updates may reset some permissions, requiring reconfiguration after each update.
Consider using automated scripts to verify and correct permissions on a regular basis, ensuring that security standards are maintained over time.
Post-Installation Configuration
Successfully installing WHMCS is only the beginning of creating a fully functional billing and automation system. Post-installation configuration involves setting up essential features, configuring integrations, and optimizing the system for your specific business needs. This phase is crucial for ensuring that WHMCS operates efficiently and provides the functionality your business requires.
Initial Admin Area Setup
After installation completion, accessing the WHMCS Admin Area for the first time presents you with the Getting Started Wizard. This wizard streamlines the initial configuration process by guiding you through essential settings that must be configured before WHMCS can be used for production operations.
Accessing the Admin Area
Navigate to your WHMCS admin area using the URL format:
Plain Text
Log in using the administrator credentials created during installation. The first login will automatically launch the Getting Started Wizard, which provides a structured approach to initial configuration.
Company Information Configuration
The first step in the Getting Started Wizard involves configuring your company information. This information appears throughout WHMCS, including invoices, emails, and the client area interface.
Enter comprehensive company details including:
•Company Name: Your official business name as it should appear on invoices
•Company Address: Complete business address including street, city, state, and postal code
•Phone Number: Primary business contact number
•Email Address: Main business email address for customer communications
•Website URL: Your primary business website address
Upload your company logo in appropriate formats (PNG or JPG recommended). The logo should be high-quality and appropriately sized for use in various contexts including invoices, emails, and web interfaces. WHMCS automatically resizes logos, but providing optimally sized images ensures better visual quality.
Currency and Localization Settings
Configure your primary currency and localization settings to match your business location and target market. WHMCS supports multiple currencies, but establishing a primary currency is essential for initial setup.
Select your default currency from the extensive list of supported currencies. This currency will be used for all pricing displays and calculations unless specifically overridden for individual products or clients.
Configure regional settings including:
•Date Format: Choose the date format that matches your regional preferences
•Time Zone: Set the appropriate time zone for your business location
•Language: Select the default language for admin and client interfaces
These settings affect how dates, times, and numbers are displayed throughout WHMCS and should match your business location and customer expectations.
Payment Gateway Configuration
Payment gateway integration is essential for automated billing operations. WHMCS supports numerous payment gateways, allowing businesses to accept various payment methods including credit cards, PayPal, bank transfers, and alternative payment systems.
PayPal Integration
PayPal integration provides a quick and reliable method for accepting online payments. WHMCS supports both PayPal Standard and PayPal Pro integrations, with PayPal Standard being easier to implement for most businesses.
To configure PayPal Standard:
Navigate to Configuration > System Settings > Payment Gateways in the WHMCS admin area. Locate PayPal in the available gateways list and click to configure.
Enter your PayPal business email address in the configuration settings. This email address must match the email associated with your PayPal business account to ensure proper payment processing.
Configure additional PayPal settings including:
•Currency: Ensure this matches your WHMCS primary currency
•Language: Set to match your customer base language preferences
•Return URL: WHMCS automatically configures this for payment confirmations
Test the PayPal integration using WHMCS’s test mode functionality before enabling live payments. This testing ensures that payments process correctly and that customers receive appropriate confirmations.
Credit Card Processing
For businesses requiring direct credit card processing, WHMCS integrates with numerous merchant account providers and payment processors. Popular options include Stripe, Authorize.Net, and Square.
Stripe integration provides comprehensive credit card processing with modern security features and competitive pricing. To configure Stripe:
Create a Stripe account and obtain your API keys from the Stripe dashboard. You’ll need both publishable and secret keys for WHMCS integration.
In WHMCS, navigate to the payment gateways configuration and select Stripe. Enter your API keys and configure additional settings including:
•Webhook URL: Configure Stripe webhooks to ensure payment status updates
•Currency: Verify currency compatibility between Stripe and WHMCS
•3D Secure: Enable for enhanced security on credit card transactions
Bank Transfer Configuration
Bank transfer payments provide an alternative for customers who prefer traditional payment methods. WHMCS includes built-in bank transfer functionality that generates payment instructions for customers.
Configure bank transfer settings including:
•Bank Name: Your business bank name
•Account Name: The name on your business bank account
•Account Number: Your business account number
•Routing Information: Any additional routing or reference information
Customize the bank transfer instructions that customers receive with their invoices. These instructions should be clear and include all information necessary for customers to complete payments.
Email Configuration
Email functionality is critical for WHMCS operations, handling everything from invoice notifications to support ticket communications. Proper email configuration ensures reliable delivery and professional presentation of automated communications.
SMTP Configuration
SMTP configuration provides more reliable email delivery than standard PHP mail functions. Most VPS providers offer SMTP services, or you can use third-party services like SendGrid or Amazon SES.
Configure SMTP settings in WHMCS:
Navigate to Configuration > System Settings > General Settings and locate the Mail tab. Select SMTP as the mail method and enter your SMTP server details:
•SMTP Host: Your SMTP server address
•SMTP Port: Typically 587 for TLS or 465 for SSL
•SMTP Username: Your SMTP account username
•SMTP Password: Your SMTP account password
•Encryption: Select TLS or SSL based on your server requirements
Test email functionality using WHMCS’s built-in email testing feature. Send test emails to verify that configuration is correct and emails are delivered properly.
Email Template Customization
WHMCS includes comprehensive email templates for various communications including invoice notifications, welcome messages, and support responses. Customize these templates to match your brand and communication style.
Access email templates through Configuration > System Settings > Email Templates. Review and customize key templates including:
•Invoice Created: Sent when new invoices are generated
•Payment Confirmation: Sent after successful payments
•Account Welcome: Sent to new customers after account creation
•Support Ticket: Various templates for support communications
Customize email templates with your company branding, appropriate language, and any additional information relevant to your customers. Use WHMCS merge fields to personalize emails with customer-specific information.
Email Piping Setup
Email piping allows customers to create support tickets by sending emails to designated addresses. This functionality improves customer service by providing multiple channels for support requests.
Configure email piping by:
Creating dedicated email addresses for support tickets (e.g., support@yourdomain.com). Configure these addresses to forward emails to WHMCS using pipe scripts or IMAP importing.
Set up the pipe script on your server to process incoming emails and create corresponding support tickets in WHMCS. The pipe script is included with WHMCS and requires proper configuration for your server environment.
Test email piping functionality by sending test emails to configured addresses and verifying that tickets are created correctly in WHMCS.
Product and Service Configuration
Configuring products and services is essential for generating revenue through WHMCS. The platform supports various product types including hosting packages, domain registrations, and custom services.
Hosting Product Setup
Hosting products represent the core offering for most WHMCS users. These products can be configured with various billing cycles, pricing options, and automated provisioning features.
Create hosting products through Configuration > System Settings > Products/Services. Define product groups to organize related offerings and create individual products within each group.
Configure hosting product details including:
•Product Name: Clear, descriptive name for the hosting package
•Description: Detailed description of features and benefits
•Pricing: Set up pricing for various billing cycles (monthly, quarterly, annually)
•Resource Limits: Define disk space, bandwidth, and other resource allocations
Domain Registration Setup
Domain registration services provide additional revenue opportunities and convenience for customers. WHMCS integrates with numerous domain registrars including Enom, ResellerClub, and Namecheap.
Configure domain registrar integration by:
Obtaining registrar API credentials from your chosen domain provider. These credentials allow WHMCS to automatically process domain registrations, renewals, and management functions.
Configure the registrar module in WHMCS through Configuration > System Settings > Domain Registrars. Enter API credentials and configure settings specific to your registrar.
Set up domain pricing for various TLDs (Top Level Domains) through Configuration > System Settings > Domain Pricing. Configure pricing for registrations, renewals, and transfers for each TLD you plan to offer.
Custom Product Configuration
Custom products allow businesses to offer specialized services that don’t fit standard hosting or domain categories. These might include SSL certificates, backup services, or consulting offerings.
Create custom products with appropriate billing configurations and descriptions. Custom products can be configured for one-time billing, recurring charges, or usage-based pricing depending on business requirements.
Server Integration
Server integration enables automated provisioning and management of hosting accounts. WHMCS supports integration with popular control panels including cPanel, Plesk, and DirectAdmin.
cPanel Integration
cPanel integration is one of the most common server configurations for WHMCS installations. This integration allows automatic account creation, suspension, and termination based on customer actions and payment status.
Configure cPanel integration by:
Adding your cPanel server to WHMCS through Configuration > System Settings > Servers. Enter server connection details including:
•Server Name: Descriptive name for identification
•Hostname: Server hostname or IP address
•Username: cPanel root or reseller username
•Password: Corresponding password for server access
Test server connectivity using WHMCS’s built-in testing functionality. Successful connection testing confirms that WHMCS can communicate with your cPanel server for automated operations.
Configure hosting products to use the cPanel server for provisioning. This links product orders to automatic account creation on the specified server.
WHM Configuration
Web Host Manager (WHM) integration provides additional control over cPanel server management. Configure WHM access to enable features like package management and server monitoring.
Enter WHM access credentials in the server configuration, ensuring that the specified account has appropriate privileges for account management operations.
Alternative Control Panel Integration
WHMCS supports various control panels beyond cPanel. Plesk integration provides similar functionality for Windows and Linux servers running Plesk control panel.
DirectAdmin integration offers another alternative for Linux-based hosting environments. Configure these integrations using similar processes to cPanel, with control panel-specific settings and requirements.
Common Issues and Solutions
Even with careful preparation and execution, WHMCS installations can encounter various issues. Understanding common problems and their solutions helps ensure smooth installation and operation. This section addresses frequently encountered issues and provides practical solutions for resolving them.
Installation-Related Issues
Installation problems often stem from server configuration issues, missing requirements, or incorrect file permissions. Identifying and resolving these issues quickly prevents delays in getting WHMCS operational.
PHP Extension Missing Errors
One of the most common installation issues involves missing PHP extensions required by WHMCS. The installation script performs comprehensive checks and will identify missing extensions before allowing installation to proceed.
If the ionCube Loader is missing or incompatible, installation cannot proceed. Resolve this by downloading the appropriate ionCube Loader version for your PHP installation from the ionCube website. Install the loader according to the provided instructions and restart your web server.
Missing cURL extension prevents WHMCS from communicating with external services including payment gateways and domain registrars. Install cURL using your server’s package manager:
Bash
# For Ubuntu/Debian systems sudo apt-get install php-curl # For CentOS/RHEL systems sudo yum install php-curl
After installing missing extensions, restart your web server and verify installation using the PHP info script created earlier.
Database Connection Failures
Database connection issues prevent WHMCS installation from proceeding and can cause operational problems after installation. Common causes include incorrect credentials, insufficient privileges, or network connectivity issues.
Verify database credentials by testing connection using command-line tools or PHP scripts. Ensure that the database user has all required privileges by attempting to create, alter, and drop test tables.
If using remote database servers, verify that firewall rules allow connections from the web server. Database servers should generally be configured to accept connections only from authorized IP addresses.
File Permission Problems
Incorrect file permissions can prevent WHMCS installation or cause operational issues after installation. The WHMCS installer checks for appropriate permissions and will identify problems before proceeding.
If permission errors are identified, correct them using appropriate tools:
Bash
# Set correct permissions for WHMCS files find /path/to/whmcs/ -type f -exec chmod 644 {} \; find /path/to/whmcs/ -type d -exec chmod 755 {} \; # Set write permissions for required directories chmod 755 /path/to/whmcs/attachments/ chmod 755 /path/to/whmcs/downloads/ chmod 755 /path/to/whmcs/templates_c/
Some server configurations may require different permissions. Consult your hosting provider’s documentation for specific permission requirements.
Memory Limit Exceeded Errors
PHP memory limit errors can occur during installation or operation if available memory is insufficient for WHMCS operations. Increase the PHP memory limit to resolve these issues.
Modify the PHP configuration file (php.ini) to increase the memory limit:
Plain Text
memory_limit = 256M
Alternatively, create a .htaccess file in the WHMCS directory with memory limit directives:
Plain Text
php_value memory_limit 256M
Restart your web server after making configuration changes to ensure they take effect.
Post-Installation Issues
Problems that occur after successful installation often relate to configuration issues, integration problems, or ongoing maintenance requirements.
Email Delivery Problems
Email delivery issues can prevent customers from receiving important notifications including invoices, payment confirmations, and support responses. These problems often stem from SMTP configuration issues or server reputation problems.
Test email functionality using WHMCS’s built-in email testing feature. If emails are not being delivered, verify SMTP configuration settings and test connectivity to your SMTP server.
Configure SPF, DKIM, and DMARC records for your domain to improve email deliverability and reduce the likelihood of emails being marked as spam.
Consider using dedicated email services like SendGrid or Amazon SES for improved deliverability, particularly if your server IP address has reputation issues.
Payment Gateway Integration Issues
Payment gateway problems can prevent customers from completing payments, directly impacting revenue. Common issues include incorrect API credentials, currency mismatches, or webhook configuration problems.
Verify payment gateway credentials by testing them directly with the gateway provider’s testing tools. Ensure that API keys are correctly entered in WHMCS and that test mode is properly configured.
Check currency settings to ensure compatibility between WHMCS and your payment gateway. Some gateways have restrictions on supported currencies or require specific currency codes.
Configure webhooks or IPN (Instant Payment Notification) settings to ensure that payment status updates are properly communicated between the gateway and WHMCS.
Server Integration Problems
Server integration issues can prevent automated account provisioning and management. These problems often relate to API connectivity, authentication, or control panel configuration.
Test server connectivity using WHMCS’s built-in testing functionality. Verify that API credentials are correct and that the server is accessible from your WHMCS installation.
Check firewall settings to ensure that WHMCS can communicate with your servers on required ports. cPanel typically uses port 2087 for SSL connections, while other control panels may use different ports.
Verify that server packages and configurations match the settings defined in WHMCS products. Mismatched configurations can prevent successful account provisioning.
Performance Issues
Performance problems can affect user experience and business operations. Common causes include database optimization needs, insufficient server resources, or inefficient configurations.
Monitor server resource usage to identify bottlenecks. High CPU usage, memory exhaustion, or disk I/O problems can all impact WHMCS performance.
Optimize database performance by implementing appropriate indexing, query optimization, and caching mechanisms. Regular database maintenance including optimization and cleanup can improve performance.
Consider implementing caching solutions like Redis or Memcached to reduce database load and improve response times for frequently accessed data.
Security Best Practices
Security is paramount for WHMCS installations due to the sensitive nature of customer data and financial information handled by the platform. Implementing comprehensive security measures protects both your business and your customers from various threats including data breaches, unauthorized access, and financial fraud.
Server-Level Security
Server security provides the foundation for protecting WHMCS installations. Comprehensive server hardening reduces attack surfaces and provides multiple layers of protection against various threats.
Operating System Hardening
Keep your server operating system updated with the latest security patches. Configure automatic updates for critical security patches while maintaining control over major system updates that might affect WHMCS operation.
Disable unnecessary services and remove unused software packages to reduce potential attack vectors. Every additional service running on your server represents a potential security risk that should be eliminated if not required.
Configure secure SSH access by disabling root login, changing default ports, and implementing key-based authentication. Use strong passwords or SSH keys for all user accounts and implement account lockout policies for failed login attempts.
Firewall Configuration
Implement comprehensive firewall rules that restrict access to only necessary ports and services. A properly configured firewall blocks unauthorized access attempts and reduces exposure to automated attacks.
Configure firewall rules to allow only essential traffic:
•Port 80 (HTTP) and 443 (HTTPS) for web traffic
•Port 22 (SSH) for administrative access, restricted to specific IP addresses when possible
•Database ports should never be accessible from external networks
Use fail2ban or similar intrusion prevention systems to automatically block IP addresses that exhibit suspicious behavior including repeated failed login attempts or scanning activities.
SSL/TLS Configuration
Implement strong SSL/TLS encryption for all WHMCS communications. Modern browsers require HTTPS for secure operations, and customers expect encrypted connections when handling financial information.
Use strong SSL certificates from reputable certificate authorities. While Let’s Encrypt provides free certificates suitable for most installations, commercial certificates may be preferred for larger businesses or those requiring extended validation.
Configure SSL/TLS settings to use modern encryption protocols and disable outdated, vulnerable protocols. Implement HTTP Strict Transport Security (HSTS) to prevent protocol downgrade attacks.
Application-Level Security
WHMCS-specific security measures protect against application-level vulnerabilities and ensure that sensitive data remains secure during processing and storage.
Admin Area Security
Protect the WHMCS admin area with additional security measures beyond standard login credentials. The admin area provides access to all system functions and sensitive customer data, making it a high-value target for attackers.
Implement two-factor authentication (2FA) for all administrator accounts. WHMCS supports various 2FA methods including time-based one-time passwords (TOTP) and SMS-based authentication.
Restrict admin area access to specific IP addresses when possible. This prevents unauthorized access even if login credentials are compromised. Configure IP restrictions through WHMCS security settings or server-level access controls.
Use strong, unique passwords for all administrator accounts. Passwords should be at least 12 characters long and include a combination of uppercase and lowercase letters, numbers, and special characters.
Database Security
Protect the WHMCS database with appropriate security measures including access controls, encryption, and monitoring. The database contains all sensitive customer information and must be secured accordingly.
Restrict database access to only necessary accounts and IP addresses. Database connections should be limited to localhost or specific application servers, never allowing public internet access.
Implement database encryption for sensitive data including customer payment information and personal details. WHMCS supports various encryption options for protecting stored data.
Regular database backups are essential for security and business continuity. Implement automated backup procedures with secure storage and regular restoration testing.
File System Security
Protect WHMCS files and directories with appropriate permissions and access controls. Incorrect file permissions can expose sensitive configuration information or allow unauthorized modifications.
Set the configuration.php file to 400 permissions (readable by owner only) to protect database credentials and other sensitive settings. This file contains critical information that must be protected from unauthorized access.
Regularly monitor file system integrity using tools like AIDE or Tripwire to detect unauthorized modifications. File integrity monitoring can identify security breaches or system compromises.
Regular Security Updates
Maintain current WHMCS versions and apply security updates promptly. WHMCS regularly releases updates that address security vulnerabilities and improve system protection.
Subscribe to WHMCS security notifications to receive immediate alerts about critical security updates. Implement update procedures that allow for rapid deployment of security patches while maintaining system stability.
Test updates in staging environments before applying to production systems. This testing ensures that updates don’t introduce operational issues while providing necessary security improvements.
Monitoring and Incident Response
Implement comprehensive monitoring systems to detect security incidents and respond appropriately to potential threats. Early detection and rapid response minimize the impact of security breaches.
Log Monitoring
Configure comprehensive logging for all WHMCS activities including login attempts, administrative actions, and system errors. Centralized log management provides visibility into system activities and helps identify suspicious behavior.
Monitor logs for indicators of compromise including:
•Repeated failed login attempts
•Unusual administrative activities
•Unexpected system errors or warnings
•Suspicious file access patterns
Implement automated alerting for critical security events to ensure rapid response to potential incidents.
Backup and Recovery
Implement comprehensive backup procedures that protect both WHMCS files and databases. Regular backups provide recovery options in case of security incidents, system failures, or data corruption.
Test backup restoration procedures regularly to ensure that backups are functional and complete. Backup systems that haven’t been tested may fail when needed most.
Store backups in secure, off-site locations to protect against local disasters or security breaches that might affect primary systems.
Conclusion
Installing WHMCS on a VPS represents a significant step toward establishing a professional billing and automation system for your hosting business. This comprehensive guide has walked you through every aspect of the installation process, from initial planning and system requirements through post-installation configuration and security implementation.
The success of your WHMCS installation depends on careful attention to detail during each phase of the process. Proper preparation, including thorough system requirements verification and security planning, prevents common installation issues and ensures optimal performance from the start. The step-by-step installation process, when followed carefully, provides a solid foundation for your billing operations.
Post-installation configuration is equally important, as it transforms a basic WHMCS installation into a fully functional business management system. Payment gateway integration, email configuration, and product setup are essential for generating revenue and providing excellent customer service. Server integration enables automation that reduces manual workload and improves operational efficiency.
Security considerations cannot be overlooked in any WHMCS installation. The sensitive nature of customer data and financial information handled by WHMCS demands comprehensive security measures at both server and application levels. Regular security updates, monitoring, and incident response procedures protect your business and customers from various threats.
Common issues and their solutions, as outlined in this guide, provide troubleshooting resources for problems that may arise during installation or operation. Understanding these issues and their resolutions helps maintain system stability and minimizes downtime that could impact business operations.
The investment in time and effort required for proper WHMCS installation pays dividends through improved business efficiency, automated operations, and professional customer interactions. A well-configured WHMCS system handles routine billing tasks, manages customer communications, and provides detailed reporting that supports business growth and decision-making.
As your business grows, WHMCS scales to accommodate increased customer bases, additional services, and expanded operations. The modular nature of WHMCS allows for gradual expansion of functionality through addon modules and integrations that extend the platform’s capabilities.
Regular maintenance, including updates, backups, and security monitoring, ensures that your WHMCS installation continues to operate effectively and securely. Staying current with WHMCS releases and security best practices protects your investment and maintains customer trust.
The comprehensive approach outlined in this guide provides the foundation for a successful WHMCS installation that serves your business needs effectively. By following these detailed instructions and implementing recommended best practices, you create a robust billing and automation system that supports business growth and customer satisfaction.
Remember that WHMCS installation is not a one-time event but the beginning of an ongoing relationship with a powerful business management platform. Continued learning, optimization, and adaptation ensure that your WHMCS system evolves with your business needs and continues to provide value over time.
Remember that WHMCS installation is not a one-time event but the beginning of an ongoing relationship with a powerful business management platform. Continued learning, optimization, and adaptation ensure that your WHMCS system evolves with your business needs and continues to provide value over time.
whmcsbuddy
Author